mTLS Gateway Developer Documentation,

Introduction
The Identity Plus mTLS Gateway is a high-precision, highly scalable access control solution that operates across multiple OSI planes to provide organizations and teams ultra-fine grained capability to secure and segment access across multiple enterprise and business pathways.
It is integrated with the Identity Plus mutual TLS based identity platform, which enables it to operate at the intersection of multiple borders between corporate, production and Internet, to collapse multiple use-cases - which currently require multiple solutions - under a single unified and integrated umbrella for any cross-environment control process, be that internal (corporate to production, production to production) or external (customers, third parties, B2B APIs, contractors, and so on).
Installation Instructions
Requirements
The Identity Plus mTLS Gateway is an augmented reverse proxy designed to operate inside a docker container. It is cloud agnostic, and depending on the environment, the requirements are in line with this model.
- A compute node virtual machine, in any cloud environment. Generally a 2 virtual core VM with 2GB of RAM should be sufficient, but please adjust according to estimated traffic. Also, the capability of small VMs may vary by cloud provider, so if you encounter difficulty building the docker, please choose a bigger VM.
- The docker can run alongside other docker images, even locally, but we recommend having a dedicated VM because the Gateway container needs to run on the host network, so it will occupy directly system ports. Strictly speaking, it can operate on a custom docker network, but in that case the proxy will not see the real IP address of clients, it will log instead the docker gateway. This is a limitation imposed by how Docker is routing packers using IPTables NAT.
- The network routing should be configured so that Gateway has visibility to upstream services it is meant to route to, inside the VPC, and be reachable externally.
- Outbound access to the Internet, for the duration of the installation
Installation Steps
Here is a brief summary of the steps we will go through during the installation
- Setting up your service in Identity Plus
- Environment configuration
- Building the Docker image
- Running the gateway in Docker
- Provisioning your first mTLS Perimeter
- Trusting the Identity Plus private CA
- Configuring the mTLS Perimeter on the Gateway
- Testing the service
Becoming A Self-Authority
From an IDENTITY perspective, Identy Plus is a Self Asserted Digital Identity Service which gives you the ability to become the Certificate Authority for your own devices - both as an individual or as a service (part of an organization) - a process we call Self-Authority. This will give you, and anyone in the system, the ability to issue client certificates that associated to their identity to be used in the interest of establishing mTLS connection (TLS authenticated conne connections).
Signing up for an Idnetity Plus Digital Identity (we don't call them accounts) essentially means issuing your first client certificate for, your first end-user device. Go to https://signon.identity.plus and follow the steps. Once the certificate is installed you may have to restart your browser (sometimes an incognito window is sufficient). This happens because browsers are caching TLS sessions and do not immediately pick up the client certificate. This technique is not standardized so your experience may vary depending on your OS and your browser. The process is successful when you are able to login into https://my.identity.plus, using the previousely installed client certifcate.
Setting Up Your Organization In Identity Plus
After step 1 is completed and you are able to log into your Identity Plus account, follow the link to https://platform.identity.plus. You will have no organizations at this point, so follow the clues. Chose Personal plan for development and testing purpose stuff and give your organization a name.
Please chose your organization id well. This is important because your organization will be assigned a name space in the .mtls.app domain, your-org-id.mtls.app, which will be unique to your organization. All of your serivces under that organization will be assigned subdomains in this name space. The organization id can be change later, but it may imply a lot of work, because all service domains will be changed and server certificates will need to be re-issued.
Setting Up Your Service In Identity Plus
Once the organization is created we need to create a service under the organization. This will serve as the mTLS Self-Authority entity (the identity of the service itself) which will serve as symbolic authority for issuing mTLS IDs (client certificates) to machine agents representing the service - one of them being the gateway itself.
An important note is that while the Gateway will require a machine to run on, it does not require a dedicated service in Identity Plus. The Gateway offers means to create mTLS Perimeters (mTLS protected routes) to services, and it acts as an agent of the service it represents - acts on behalf of. Each routed service has its own slice on the Gateway and that slice is configured with access control dedicated to that service in particular.
Once the service is created, in the “identity” section, choose a domain name for the service. This can be changed later, but it has implications. Any certificates issued up to that point need to be rotated to reflect the new name, so it is not without complexities.
You can pick a domain name in the organization name space service-x.your-org.mtls.app, which is free and automatically allocated to the service, or you can choose a custom domain.
If you choose a custom domain, make sure you have access to the domain registrar configuration panel, as you will have to add a TXT DNS record to verify ownership of the custom domain.
Environment Configuration
There are a few steps we need to take care of so everything goes smoothly once we build the docker image to ensure the gateway is accessible and configurable.
Firewall
Presumably you will be running the gateway behind a firewall and if that is the case please make sure that the following ports are open and reachable across the Internet (or wherever the service is going to be accessed from):
- Port 443, the standard HTTPS port your upstream service will be exposed via the Gateway over mutual TLS
- Port 444, the Gateway management port, non-standard HTTPS port used by the Gateway management console to leave 443 open for services.
- Port 80, standard HTTP port, necessary for initializing the Gateway - HTTPS is impossible as there is no server certificate on startup - and moving forward, this port will be reserved exclusively for issuing Let’s Encrypt certificates for services. For Let’s encrypt to be possible, port 80 will have to be reachable from the Internet, by Let’s Encrypt Authority service
Additionally, on the Gateway machine, port 81 - non-standards HTTP - will have to be reachable from the private network (the upstream services) in case OIDC/Oauth2 functionality. Please make sure this port is NOT accessible from the Internet.
Discovery (DNS)
We also need to make sure the Gateway is discoverable, so we need to configure DNS entries. For this you need the publicly reachable IP address of the machine the Gateway is running on, and depending on your choice of domain, the configuration will be one of:
- For service.your-org.mtls.app domains, please go to the DNS menu in https://platform.identity.plus service section, and add an empty, and optionally wildcard (*) record pointing to the publicly reachable IP address.
- For custom domains, once verified, please proceed to your domain registrar and add the same records.
Docker
To run the Gateway, you will need Docker on the virtual machine. We recommend an Ubuntu flavor Linux OS, as the Docker image is built on Ubuntu. Other distributions work too, but this will help with compatibility issues.
Please upgrade your VM for latest security patches and install Docker on the VM using:
sudo apt update
sudo apt upgrade
sudo apt install docker.io
Building The Docker Image
Once Docker is installed, please ssh to your VM and run the following sequence of commands. We recommend you save them in a docker-build.sh shell script, as this will help with future upgrades for the Gateway.
#!/bin/bash
echo "preparing directory ..."
mkdir -p /media/Work/Config/mtls-gateway
echo "fetching latest dockerfile ..."
cd /media/Work/Config/mtls-gateway
curl https://raw.githubusercontent.com/IdentityPlus/mtls-gateway/refs/heads/main/bin/x86_64/ubuntu_24.04/Dockerfile > /media/Work/Config/mtls-gateway/Dockerfile
echo "building docker image ..."
docker build --no-cache -t mtls-gateway-v2 /media/Work/Config/mtls-gateway
Running The Gateway In Docker
A few notes with respect to the way we run the docker image:
- We run it on the host network, to allow the proxy to see the real IP of the client
- We will be mapping the Gateway configuration directory and the Gateway data directory on the hos
For easier re-use, please save the following commands in a docker-run.sh shell script and execute it. Depending on how you configured Docker, you may need root privileges.
#!/bin/bash
echo "preparing directory ..."
mkdir -p /media/Work/Data/mtls-gateway
echo "running docker image ..."
echo "docker run -d \\
  --restart unless-stopped \\
  --network host \\
  --name mtls-gateway \\
  -v /media/Work/Config/mtls-gateway/:/etc/mtls-gateway/ \\
  -v /media/Work/Data/mtls-gateway/:/var/mtls-gateway/ \\
  -v /media/Work/Data/mtls-gateway/.certbot:/etc/letsencrypt \\
  mtls-gateway"
docker run -d \
  --restart unless-stopped \
  --network host \
  --name mtls-gateway \
  -v /media/Work/Config/mtls-gateway/:/etc/mtls-gateway/ \
  -v /media/Work/Data/mtls-gateway/:/var/mtls-gateway/ \
  -v /media/Work/Data/mtls-gateway/.certbot:/etc/letsencrypt \
  mtls-gateway
For convenience, you can also save a docker-cleanup.sh shell script, which also contains a backup sequence to back up the docker data files, as follows:
#!/bin/bash
echo "stopping docker instance: mtls-gateway ..."
docker stop mtls-gateway
echo "backing up data files ..."
mkdir -p /media/Backup/mtls-gateway
tar -czf /media/Backup/mtls-gateway/backup-$(date +%Y%m%d-%H%M%S).tar.gz /media/Work/Data/mtls-gateway/
echo "removing docker instance: mtls-gateway ..."
docker rm mtls-gateway
This will allow you to upgrade your mTLS Gateway instance to the latest version with a simple sequence of commands:
./docker-build.sh
./docker-cleanup.sh
./docker-run.sh
We advise running them in this order, as this will ensure minimum downtime. The docker build command is the longest running one, so by preparing the new image first will ensure a very fast restart.
Provisioning Your First mTLS Perimeter
If all goes as expected, the Gateway should be running now in an uninitialized mode - it has no perimeters configured, no certificates, ids, no https. To initialize the Gateway we will have to create the first perimeter. For this, please go to:
http://xxx.xxx.xxx.xxx/ where xxx.xxx.xxx.xxx is the public IP address of the Gateway. With some custom domains using the domain name instead of IP would work, now that the DNS is already configured, but this is not consistent. With *.mtls.app the browser will automatically switch (prior to making a call) to https, because .app is a secure TLD. This may be true for your domain too, and also, you may have Strict Transport Security (HSTS) with preload, in which case again, the browser will switch before making an HTTP call. For consistency we will use the IP address.
In a second tab, please go to https://platform.identity.plus, find the service you created under your organization, select the “Service Agents” menu and generate an “Autoprovisioning Token”.
Grab the token, and paste it in the only field available on the Gateway and click “Provision”.
If all goes as expected, you should see a button “Continue Over mTLS”, but before you do, let’s proceed to the next step.
Trusting The Identity Plus Private CA
Identity Plus Self-Authority is a novel concept in the identity and certificate authority space, and while it is predominantly focused on Client Certificates, it does have the ability to issue server certificates also, using its private CA. This is not only very convenient in multiple use cases where public CAs are not readily available, but there are many situations - such as internal domains - where public Authorities are not even an option.
The autoprovisioning of the Gateway and maintaining continuous availability of the certificate through regular rotation is also such a case. Once the Gateway is configured, it can work with Let’s Encrypt certificates, which means this step is not necessary for regular consumers of the service, but for an administrator it is important to be able to work with the Identity Plus private CA.
In the Gateway window, you can find a download button, which you can use to download the private CA file.
To make the browser trust the CA, you need to import it into your key chain:
Using Chrome
On Windows and Linux environments, you can use Chrome for this purpose:
- Settings
- Privacy & Security
- Security Section
- Manage Certificates Link
- Local Certificates
- Installed by you
- Then click import, and select the downloaded file
Using Windows Certificate Manager
On Windows, you can also use the OS Certificate Manager Tool
- Press Windows+R key combination
- Type certmgr.msc
- Make sure it is “Current User” not System
- Right Click Trusted Root Certificate Authorities Menu
- “All Tasks” menu, “Import” submenu
- Select the file and import
Using Mac OS Key Chain Utility
On Mac, you can do this through the Key Chain
- Open KeyChain
- Select “User Key Chain”, make sure you are not trusting this for all on the system
- Click “Import” to import the file
- Once imported, double click on the certificate
- Open the “Trust” section and trust the certificate as “Server Certificate Authority”
In all cases, you may need to restart the browser to clear the TLS cache, but you should first try clicking "Continue Over mTLS" to open the Gateway Management Panel.
Operating The Gateway
Overview
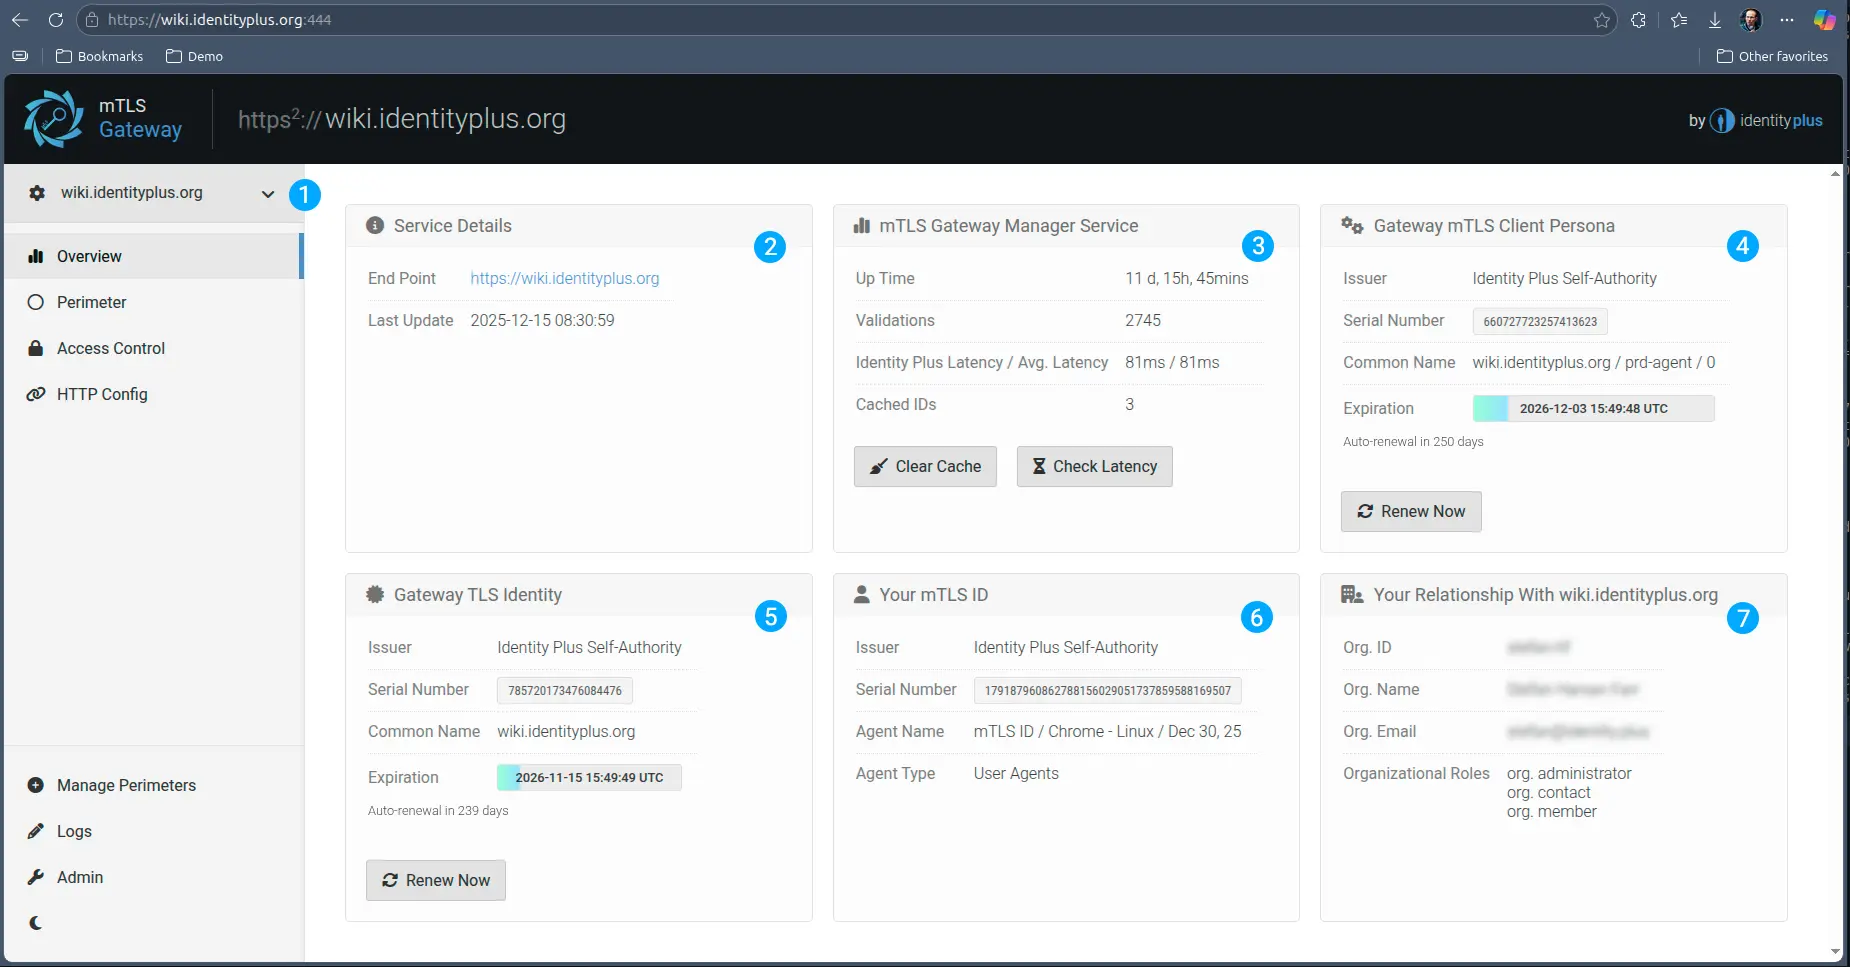
- A drop-down menu to access all perimeters configured on the gateway
- Brief details on the perimeter, including a convenience link to access the service, which operates on the same domain as the service but different port
- Health status on the Integration with Identity Plus, including the possibility to clear all cached mTLS ID validations - this is handy if a person’s role has changed and it is impractical to wait for the cache to time out.
- The mTLS ID status of the Gateway as an agent of the Gated service. The associated client certificate is rotated automatically, but you can also force a manual renew as often as you like
- The Server Certificate the Gateway Management Console operates with, issued by Identity Plus private CA. Also automatically rotated, but can be manually rotated if needed.
- The mTLS ID you (the admin) connect with to the Gateway (essentially the client certificate in your browser)
- Relationship information with your organization and the upstream service. Since you configured this, you will likely have admin and manager roles, but for other people, custom roles can be defined.
Configuring the mTLS Perimeter
A perimeter is the border we can enforce, and in the specific case of mTLS, it is where we apply the mutual TLS enforcement. As any useful, or better said manageable perimeter, it requires a traversal configuration - an external entry point and an environment being accessed. In network jargon, this would be equivalent to the proxy configuration - which is what this configuration is about.
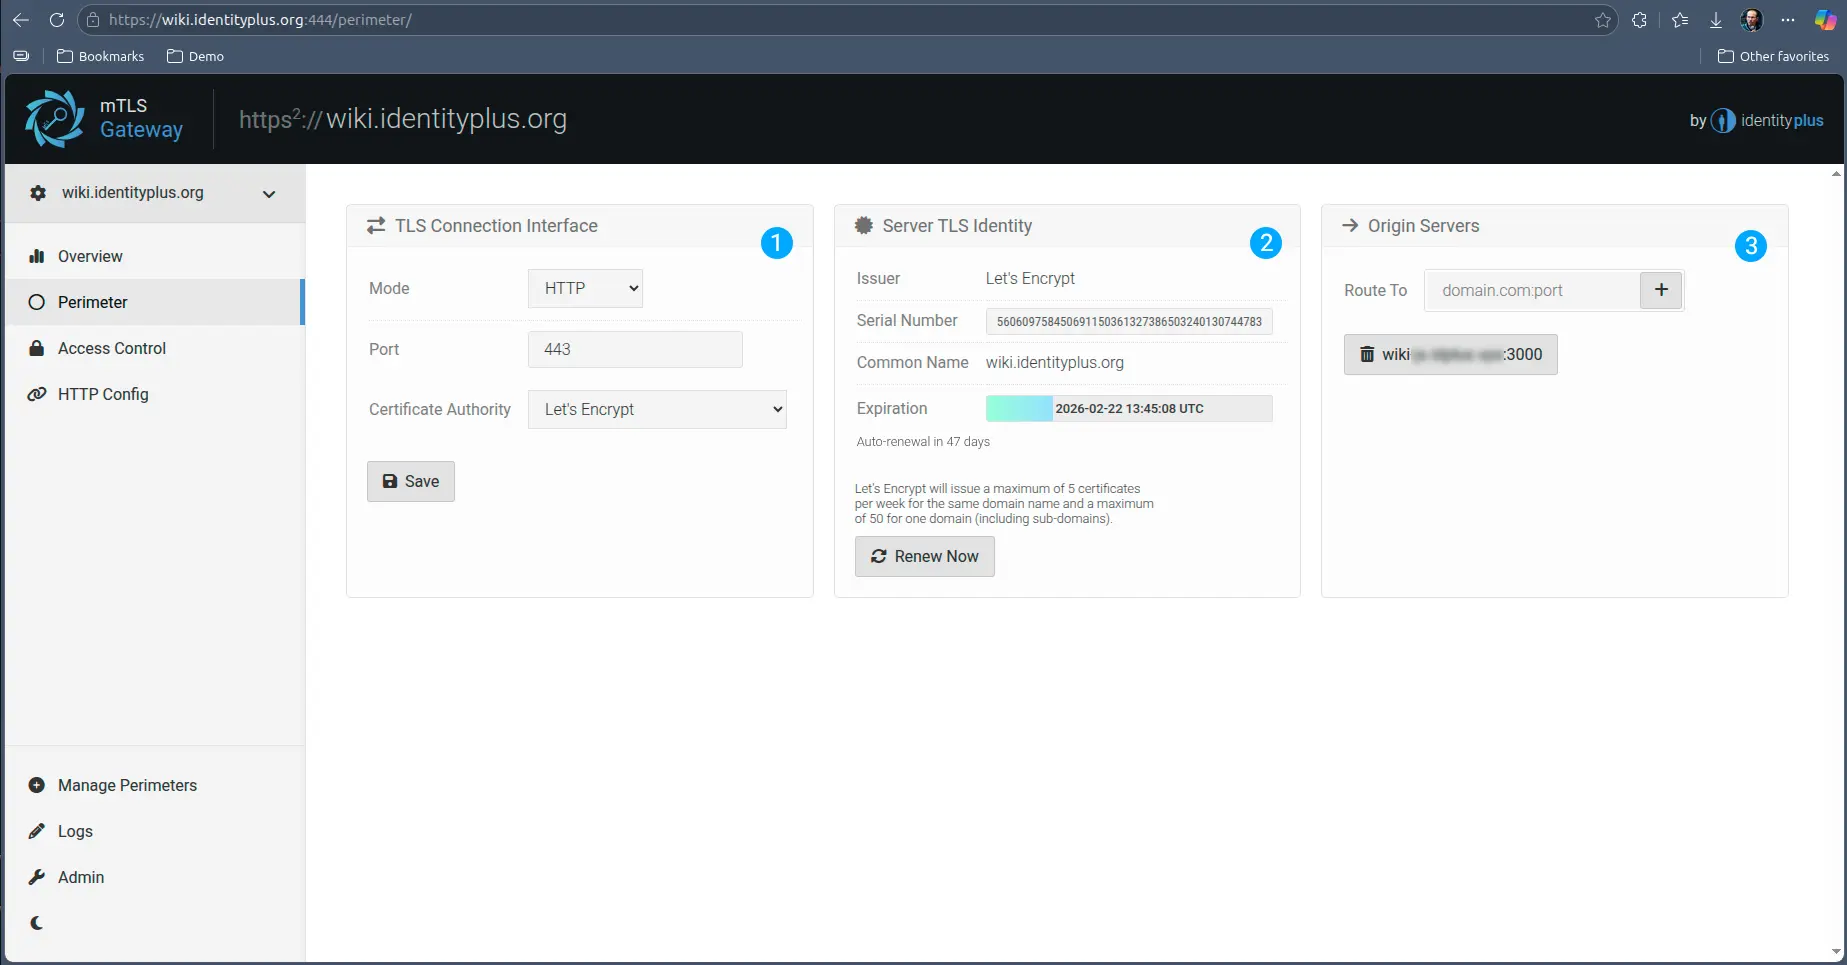
- Section one refers to the public networking interface the gateway exposes to incoming traffic. This will always be TLS (in fact mutual TLS) traffic that may have either HTTP(s) applications on top of it or generic (application protocol agnostic) TCP(s) applications.
As any TLS endpoint this requires a TLS Server Certificate, which defaults to the Gateway Server Certificate issued by the Identity Plus private CA, but it can be switched to Let’s Encrypt Public Authority.
- Information on the certificate the underlying service is exposed over. Whichever the authority, this certificate also renews automatically, but if it is issued by Let’s Encrypt, this section also allows manual renewal - please read the instructions if you want to manually renew. In case of Identity Plus Private CA, the renewal is done in the Overview section - it is the same as for the Gateway.
- Is the routing configuration to the back-end, or mTLS gated, service. Based on the fulfilment of the access conditions, traffic is routed plain text to the internal service. You can configure multiple service workers for round-robin load balancing.
Configuring Perimeter Access Control
In this tab you can configure the Access Control behavior of the Gateway. Depending on the configuration, the Gateway can assume a more or lesser role in the access control decision based on the identity of the client and its relationship with the upstream service.
At a minimum, the Gateway will always unpack (or terminate) the TLS communication and inspect the client certificate for basic characteristics, such as existence and validity.
This shared approach is only applicable for the HTTP case, as in the case of plain TCP (treating communication as binary) the Gateway is ignorant to the application protocol, and therefore there are no means to share responsibility.
In HTTP mode, in addition to offloading and validating the client certificate, the Gateway will always forward upstream in a header the serial number of the client certificate (the ID reference). This will allow the upstream application to either use that for logging, or further processing. The extent of how much more it does, depends on this configuration.
Application Mode
In application mode, the Gateway assumes minimal responsibility. It will NOT reach out to Identity Plus for dynamic identity validation, it assumes the upstream application is responsible for that. This also means that further access configurations on the gateway are not applicable.
In this case, to preserve the perimeter nature of the access, the application should process the validation in the top of the first request, prior to responding to the proxy.
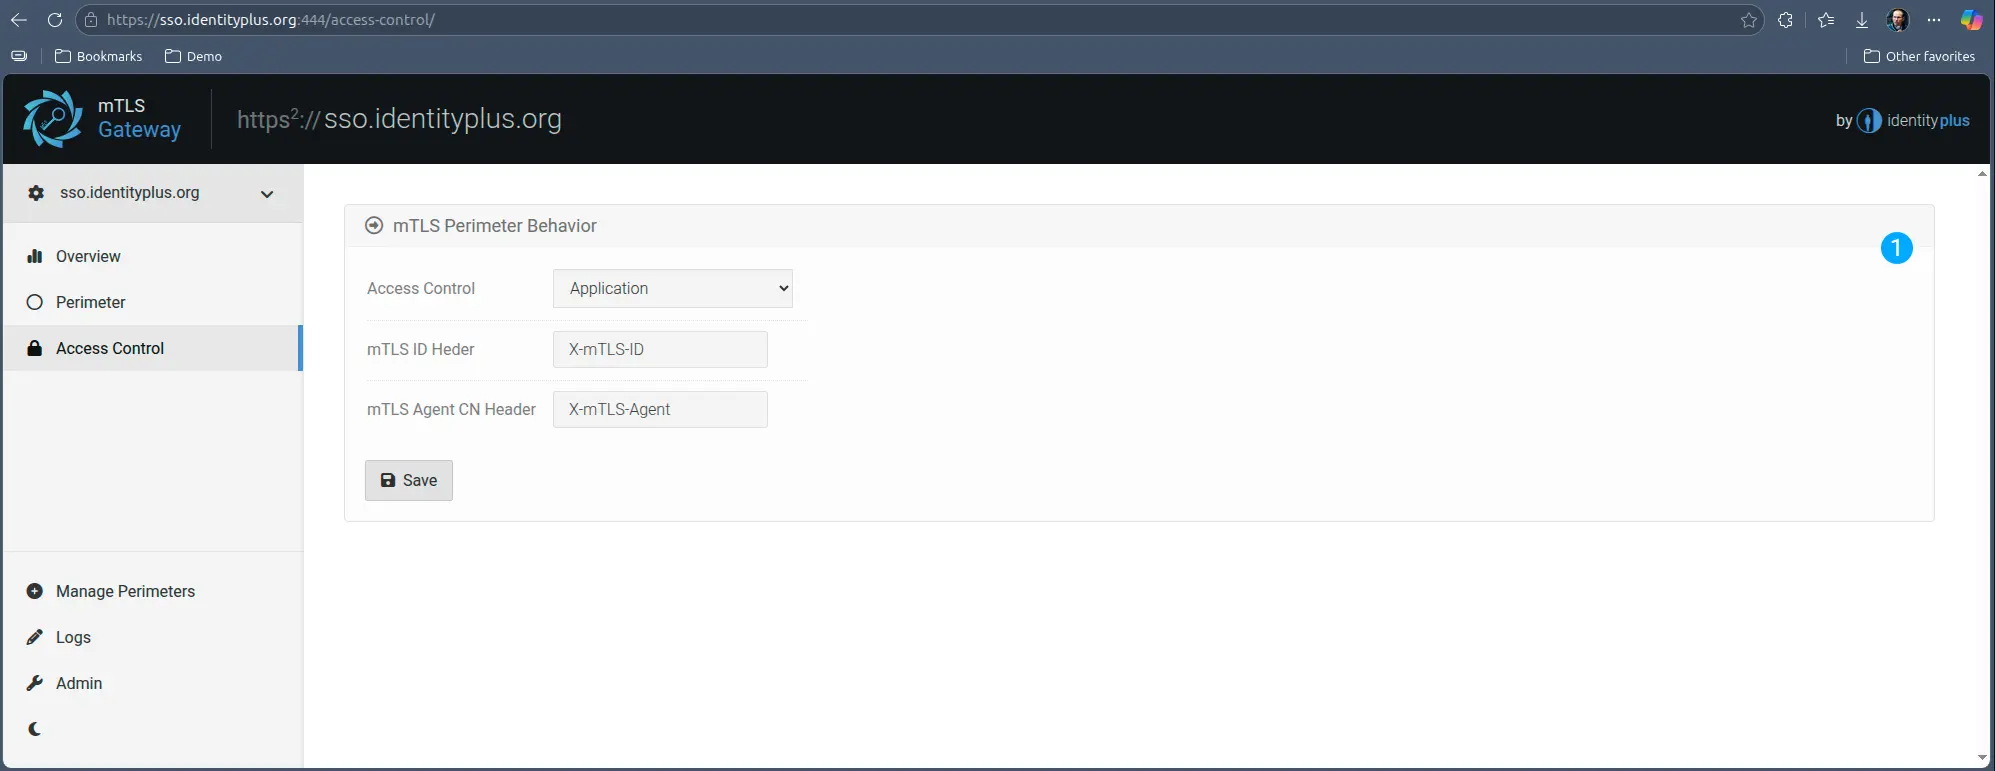
Should the application decide it does not want to respond to the client for any reason, it is advisable to send connection close signals to the proxy to not leave http connections open.
Gateway RBAC
The total opposite of this mode is Gateway RBAC. In this mode, the Gateway assumes complete responsibility for the access control, and while it sends mTLS ID upstream, the assumption is that the upstream service does not know what to do with it.
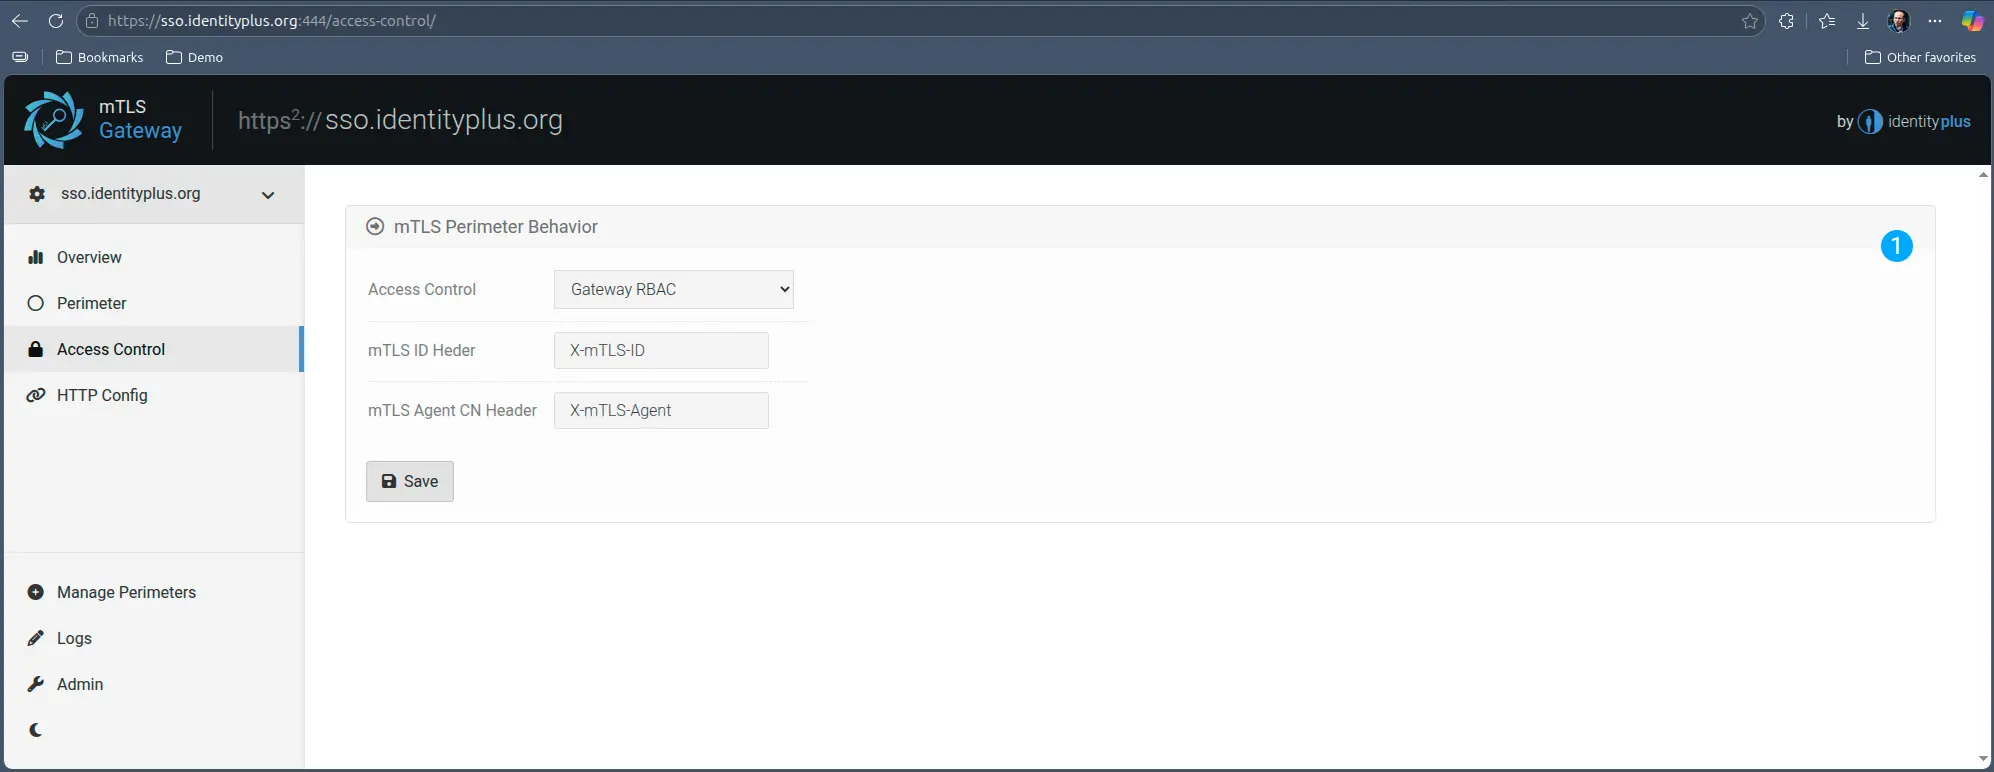
That being said, in HTTP mode, all other fine-grained access control modes (see next section) are available in this mode. This can be very helpful in case of legacy applications, because it enables very strong, segmented control, with zero touch on the upstream server.
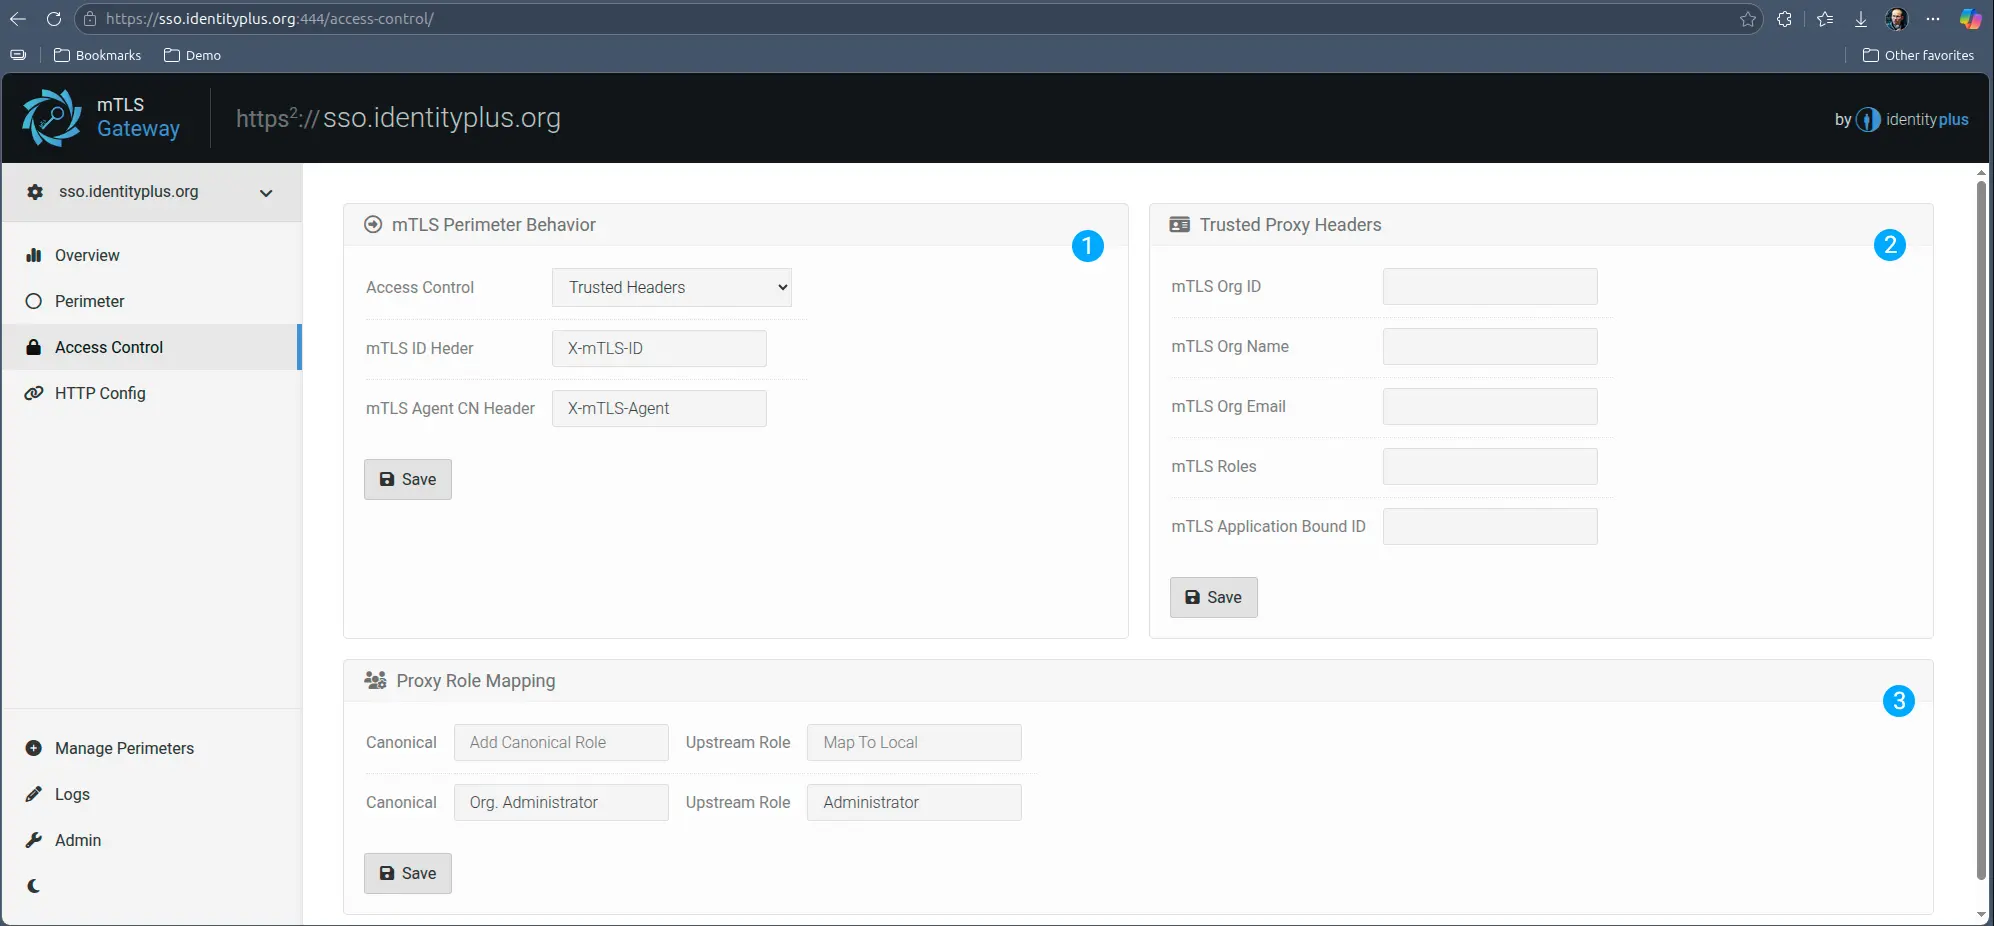
Trusted Headers
For services that can accept authentication and role information in HTTP headers this mode can be a highly effective and fast method for integrating corporate single-sign-on. The mTLS Identity conveyed via the browser client certificate is instantly mapped into a corporate account via organizational relationships, forwarding local account and role parameters to the upstream service for zero-trust, zero-redirect, zero-touch, instant authentication and access control.
OIDC / OAuth2
Probably the most widely accepted single-sign-on method in the SaaS space is OIDC / OAuth2 combination, which while not as transparent as Trusted Headers are, it is still very lightweight in the context of mTLS Gateway.
mTLS Gateway runs its own internal OIDC / OAuth2 identity provider and authorization service which the upstream service can consume as a corporate single-sign-on. Similar to trusted headers, the Gateway will translate the mutual TLS bound Identity to corporate identity and local account via an OIDC / OAuth2 callback.
While the OIDC / OAuth2 protocol combination enforces an authorization redirect, since the Gateway sits in the middle of the communication between the upstream (OIDC client) and the user (Application client, and authorizer) the redirect happens in the context of the same service - the user is not redirected to a different domain and application. Instead, authorization is automatically enabled via the already authenticated mTLS channel, and the service performs a callback to the Gateway for ODIC user-info. Both authentication, authorization (roles) and user provisioning can be automatic.
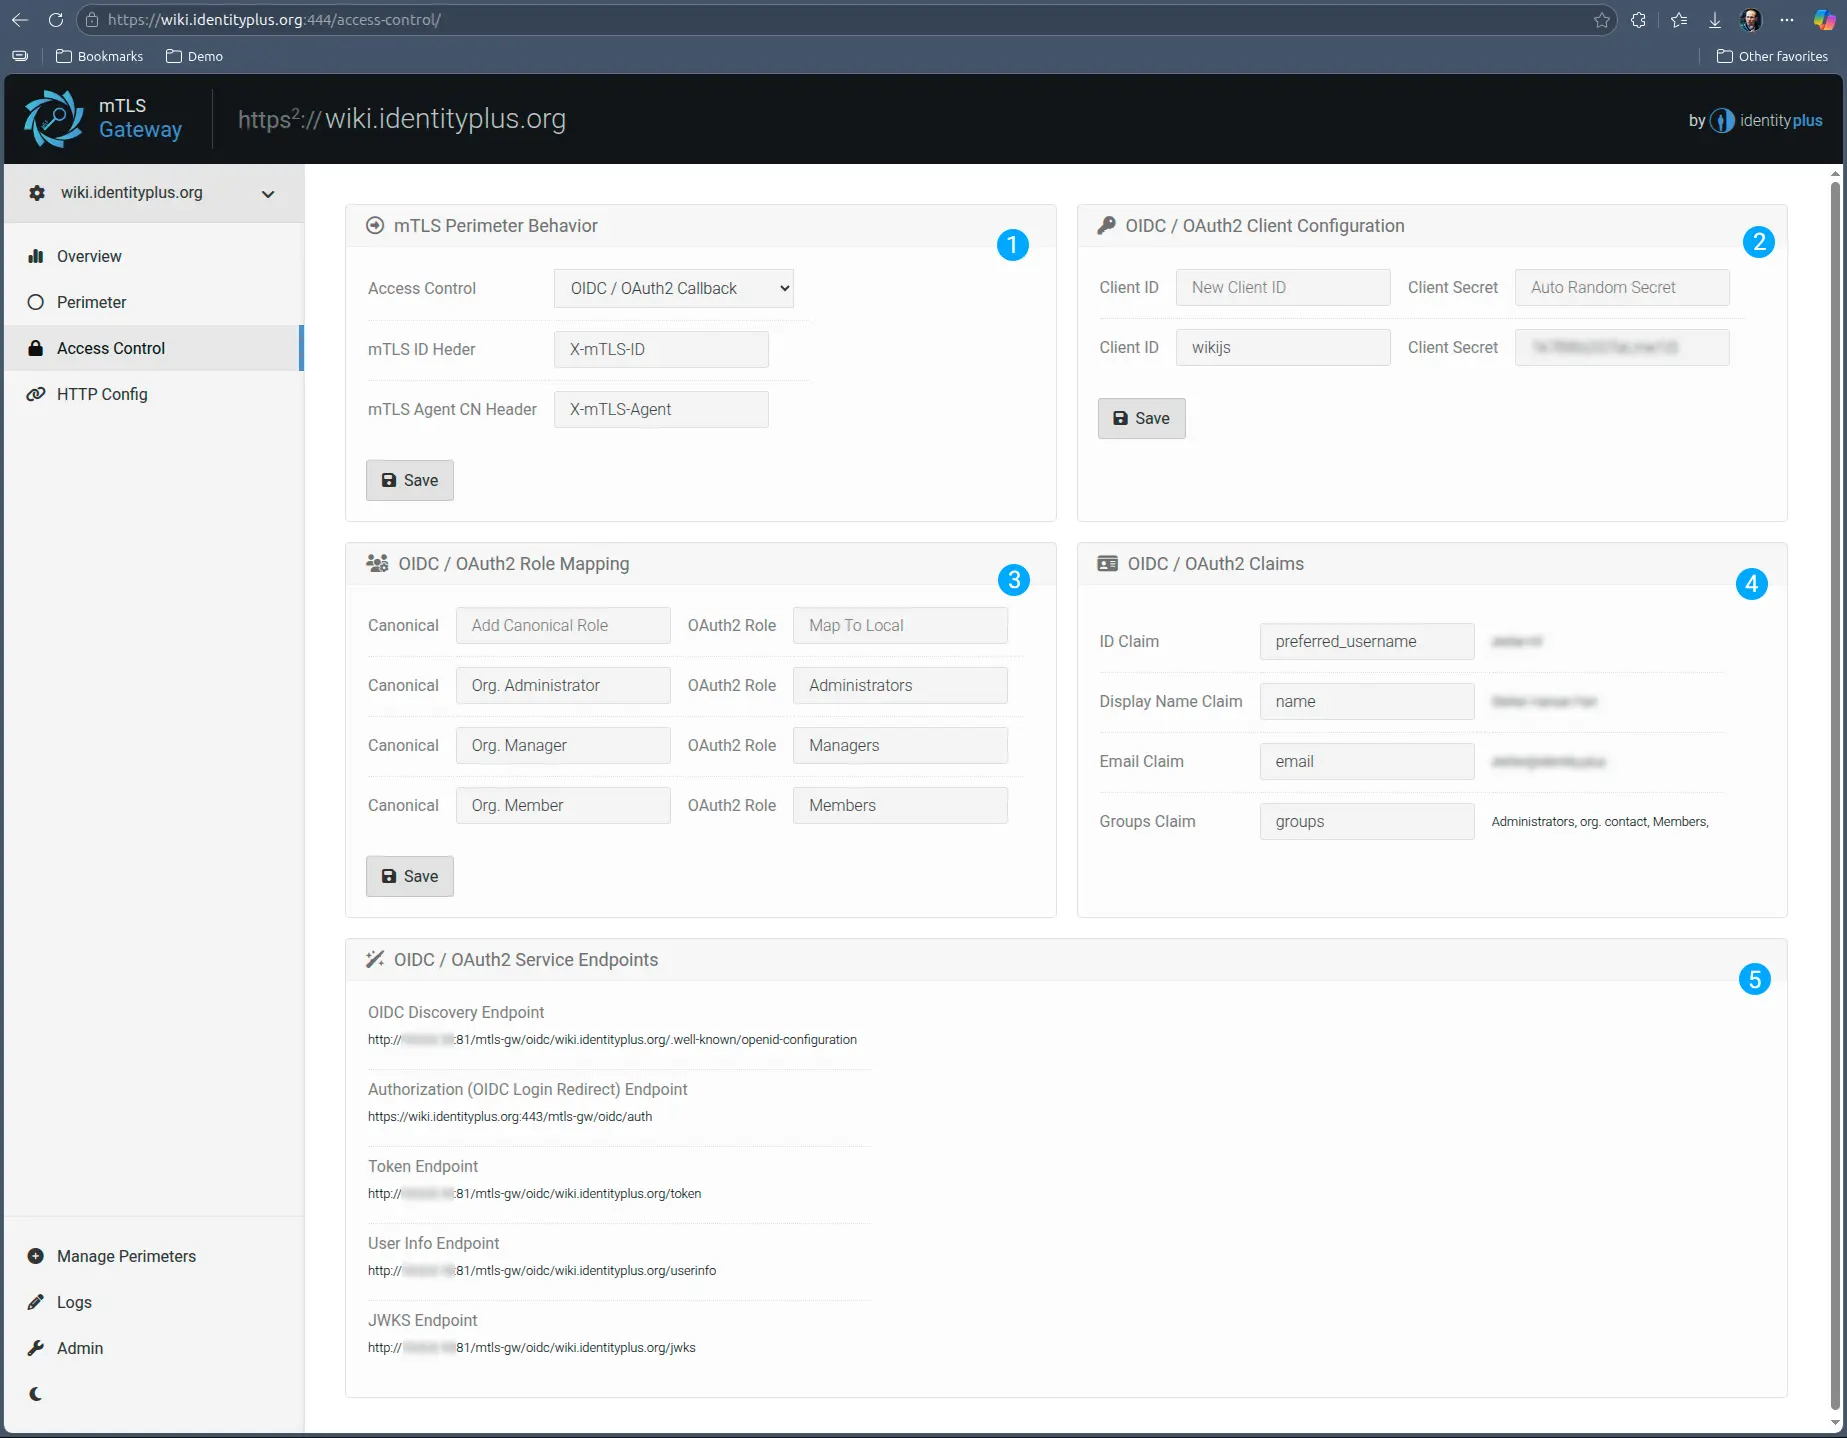
- Same as previous, configures the access control
- Allows for defining and mapping OIDC client ID and secrets. This is convenient in case the upstream service is adamant on using pre-defined names and secrets.
- Since not all upstream applications have the same type of roles, mapping organizational and application roles at the gateway enables organizations to correctly send user authorization custom-tailored to each SaaS application used.
- This section is information only, to assist in configuring the OIDC / Oauth2 authentication in the upstream service.
- Same as 4, these are the URLs the upstream service needs to reach back to as part of the OIDC / OAuth2 authentication and authorization flow.
Protocol Specific Configuration
Once the Gateway determines the status of the mTLS Identity of the client, it has the ability to take a configurable decision on how to treat the request. This greatly depends on the protocol the upstream application and the downstream client to that service communicate on.
TCP
If the traffic is treated as generic TCP, the Gateway will not interfere with the communication itself, which is treated as binary, it will only operate on mTLS specific factors, such identity validity, and role.
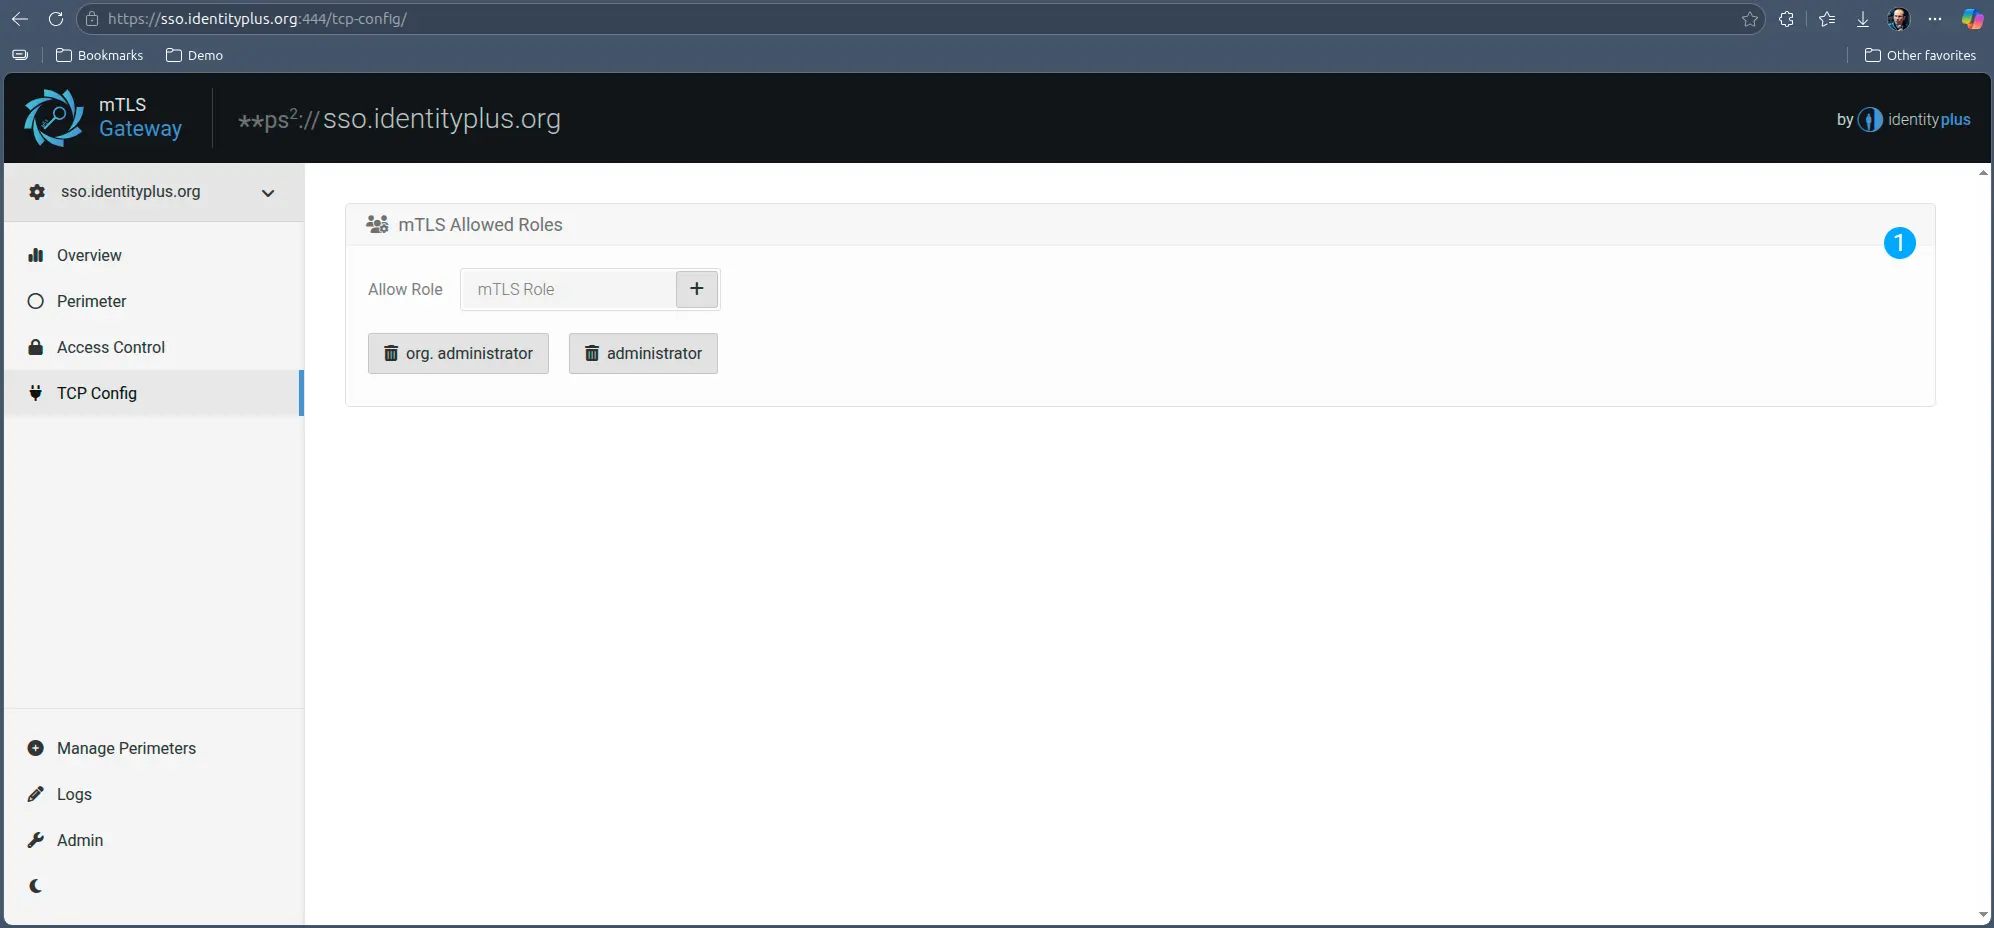
You can enforce specific roles for the client service, which, if not present in the client / service configuration in the Identity Plus Platform, the Gateway will fail the client request and the upstream service will never receive it.
HTTP
Since the http protocol is highly popular and has well defined means of pre-processing at proxy level, the Gateway has sophisticated options for highly granular access control:
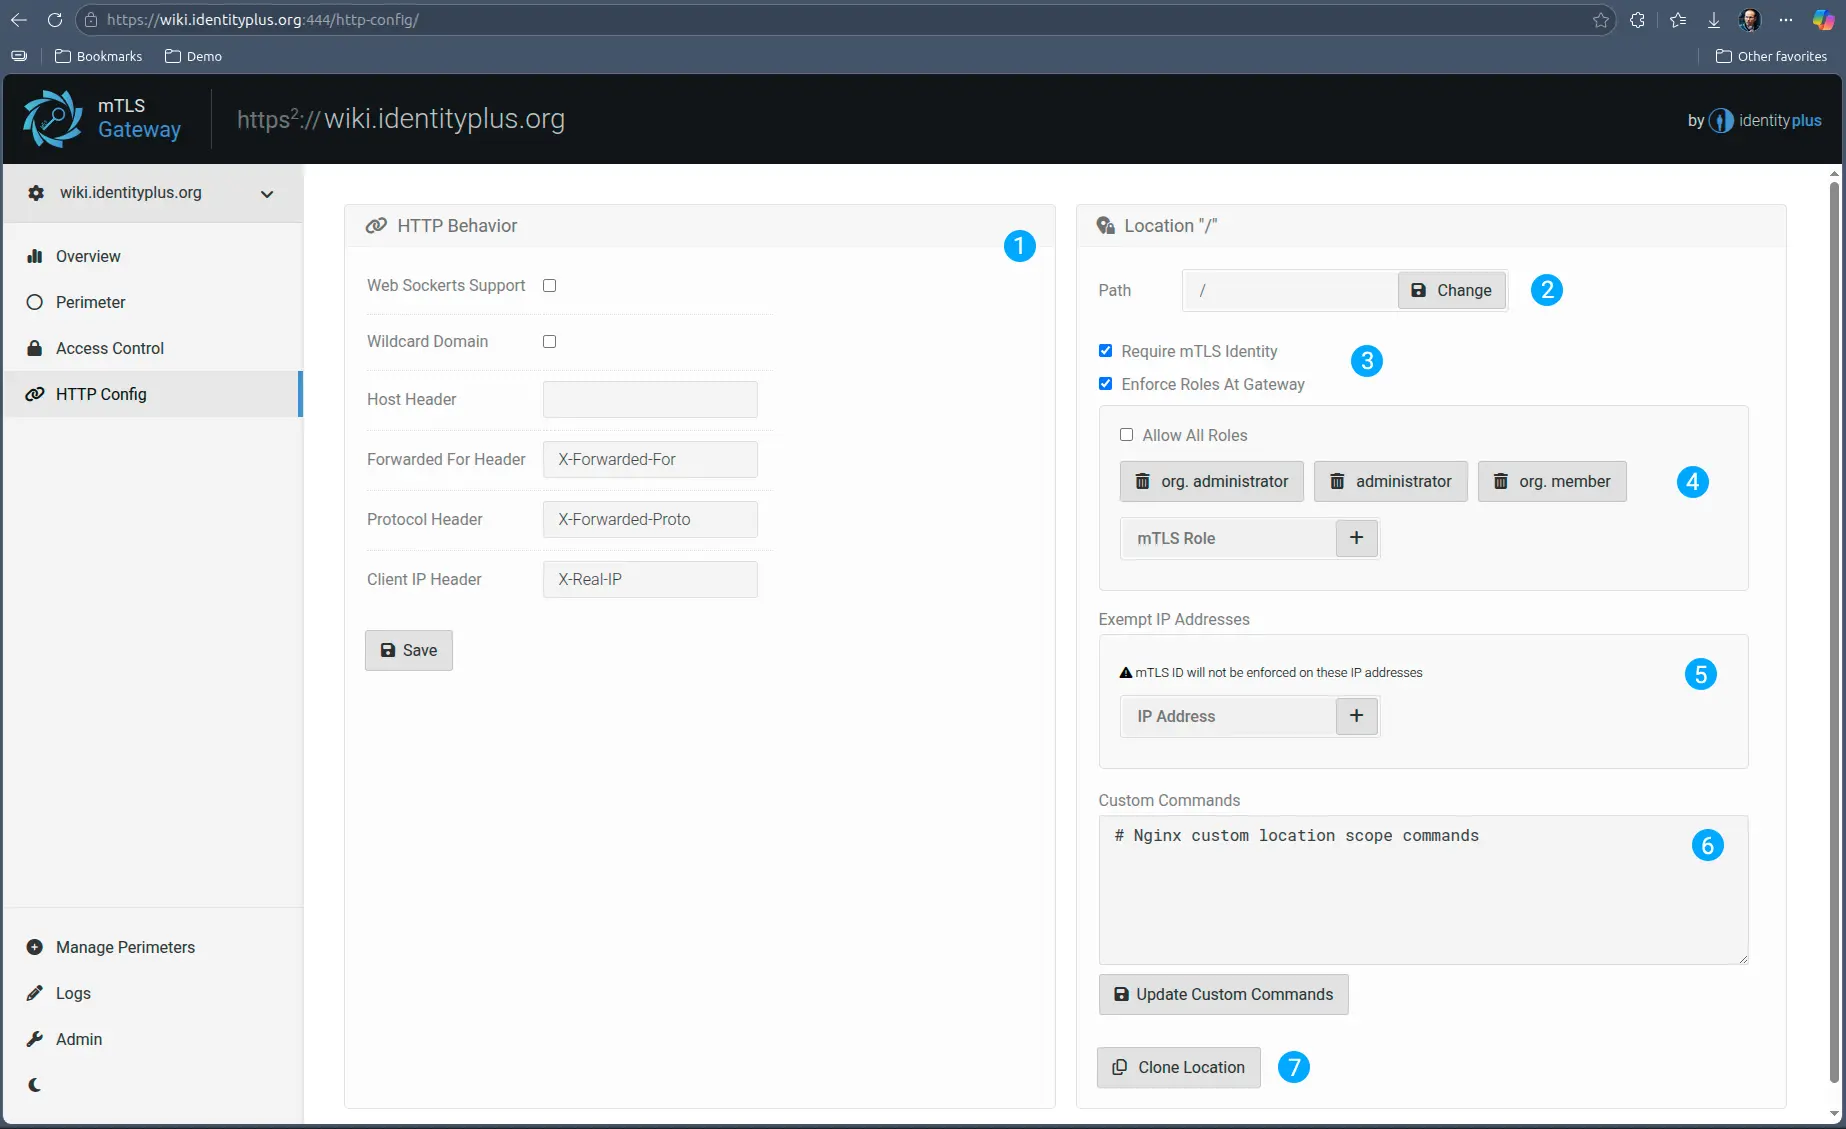
- You can for example enable various HTTP protocol features, such as web-sockets, or alter the host, or you can configure custom headers for various standard HTTP headers. This can be very handy for legacy applications, where it is difficult to make such configuration changes.
- Access control can be defined on a per URL prefix basis. As in every case, “/” means everything, but more specific paths, “/example/” , take precedence over more generic ones “/”. This allows you for example to configure different rules, as explained below.
- You can for example enforce mTLS on “/admin/” but disable it for the rest of the site “/”. Or on the contrary, you may have a “/resources/” path which may not require mTLS, but everything else “/” does.
- If you decide to enforce roles at the Gateway - similar as in the case of TCP - in HTTP mode you can opt to either enforce a subset of roles, which means the client must have any of those, otherwise the request never reaches upstream or, you can enforce at least one role. In this latter case, the client does not have to have one specific role, but it must have at least one. The role is then passed upstream to the service to allow for further role based segmentation.
- You can also configure certain paths to be exempted from mTLS ID enforcement, based on IP address. This is convenient if you want to white-list a certain external or internal client.
- You can also add Nginx custom configurations should you need something highly specific. This section is only reached if all mTLS based rules are satisfied, otherwise, the connection will fail prior to reaching this phase.
- For convenience, you can clone and modify locations.
Managing mTLS Perimeters
mTLS Gateway can gate any number of upstream services on the same instance. Each service will have its own configuration and will operate on its own domain. This is possible as long as clients support SNI (server name identification) for TLS connections, which all modern clients do.
However, once a service is provisioned, the Gateway transitions into an initialized state, which means it will no longer respond on port 80 for initialization. From this point on, provisioning additional mTLS Perimeters is done in this section.
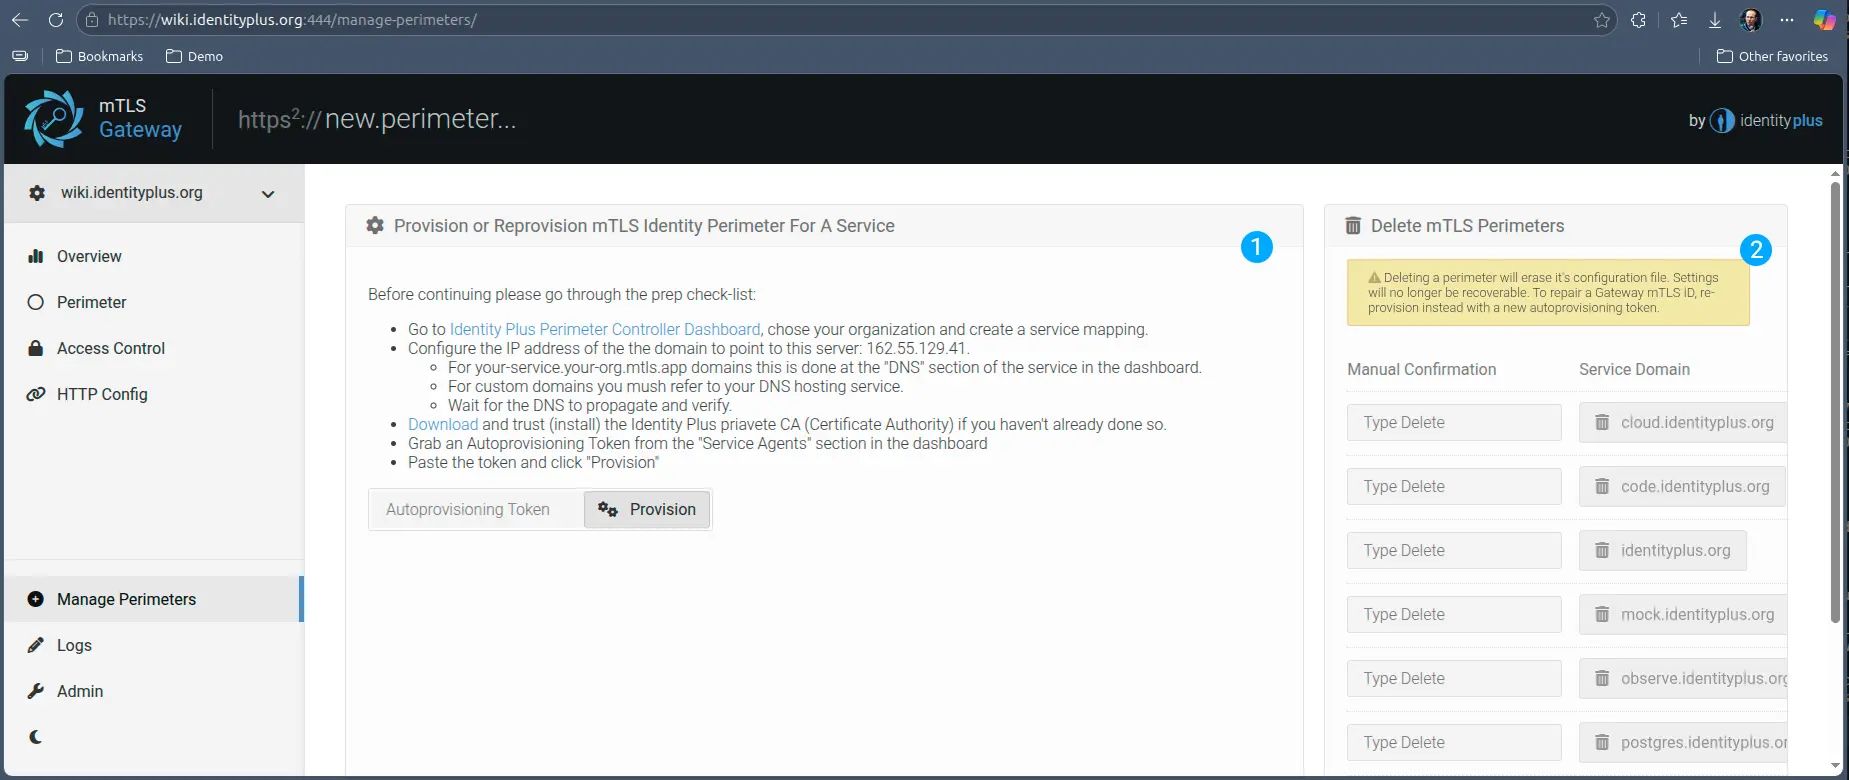
- Provisioning additional mTLS Perimeters is done exactly the same way as in the initialization phase, using an autoprovisioning token
- You can also delete perimeters that are no longer needed. Please make sure you delete the correct service, as the configuration is not recoverable after delete. That being said, it is only the configuration that is lost, deleting a service here only deletes the routing and the Gateway configuration. It does not affect your upstream service, nor does it affect the Self-Authority configuration of the service in https://platform.identity.plus.
Logging Configuration
The logging in the Gateway panel gives you access to all audit trails and logs, both admin and HTTP traversal.
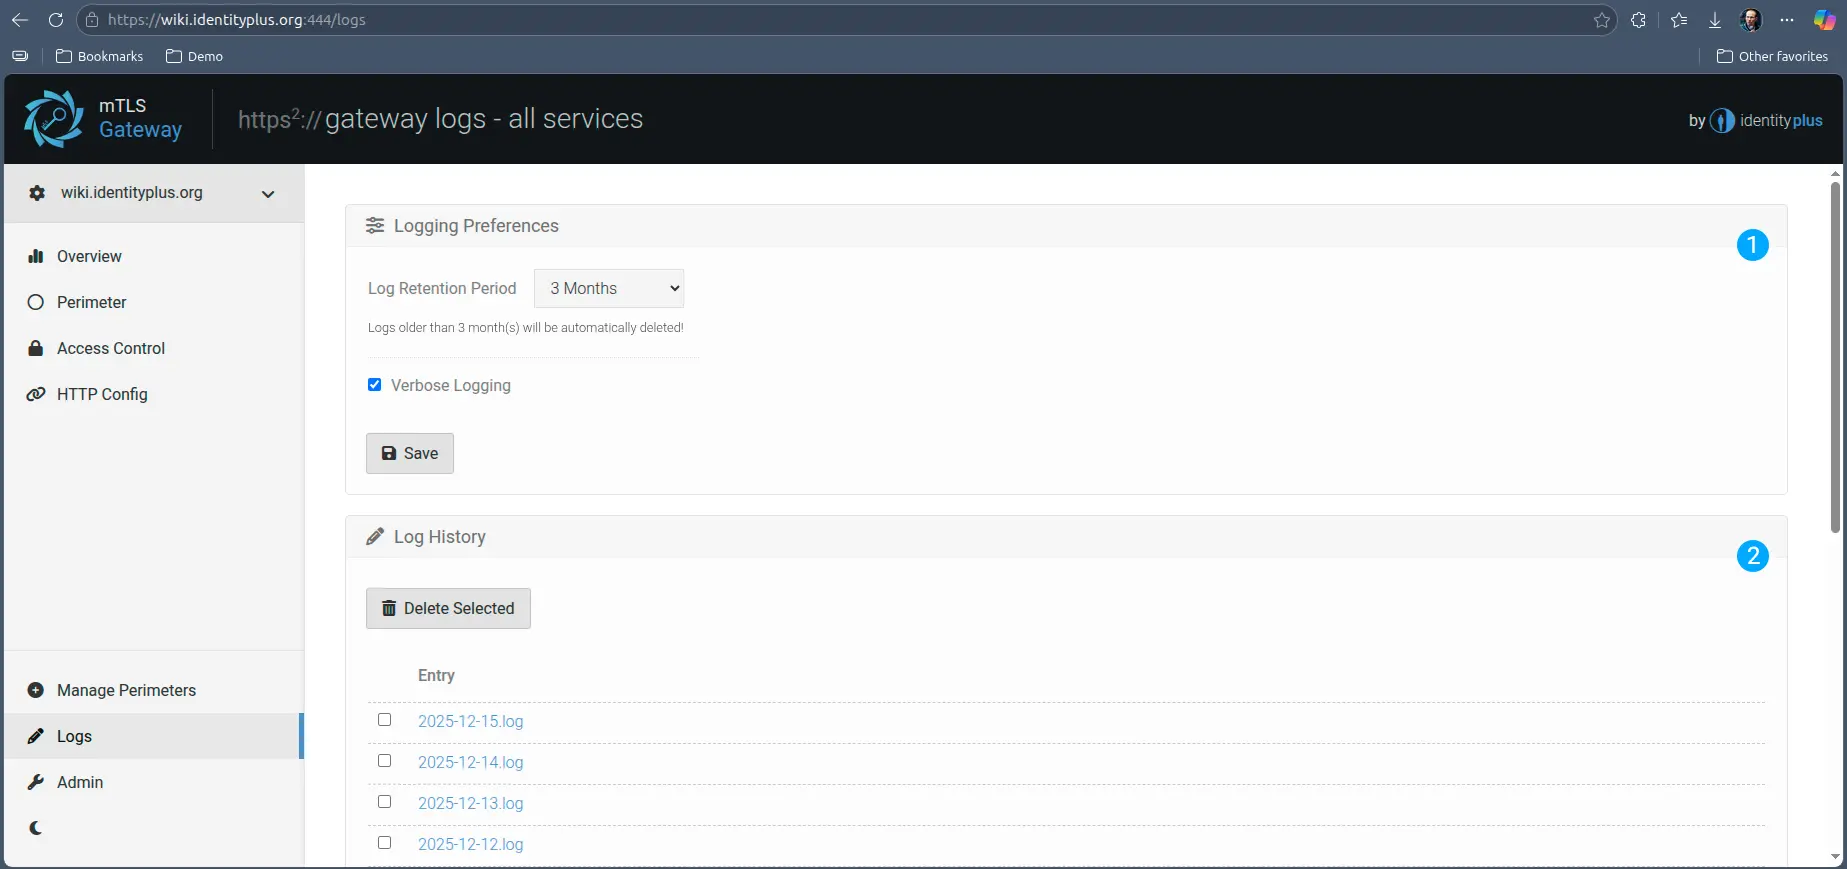
- You can configure the Gateway to be more or less verbose for debugging purposes, and you can configure a certain retention period.
Please be mindful of the retention period. Logs are saved onto the host, and depending on traffic they can quickly fill up the disk if you deploy on a small machine - this may depend on the cloud provider and machine size.
The logs are also available in the work directory of the Gateway on the host machine, so if you need long-term retention, we recommend you ship them from there into long term storage and set a smaller retention period on the Gateway.
- The service opens a new log file every day for log isolation, and you can open all logs in the Gateway manager for convenience. You can also manually delete logs in this panel.
Admin
Admin panel allows you to change the base configurations of Gateway and reboot it without having to restart the Docker the Gateway is running in. The parameters are pretty self explanatory, with most of them operating out of the box the way most deployments need.
However, there may be cases where you need to NAT the traffic, or when the Gateway services must operate inside the Docker on a different port they are visible outside.
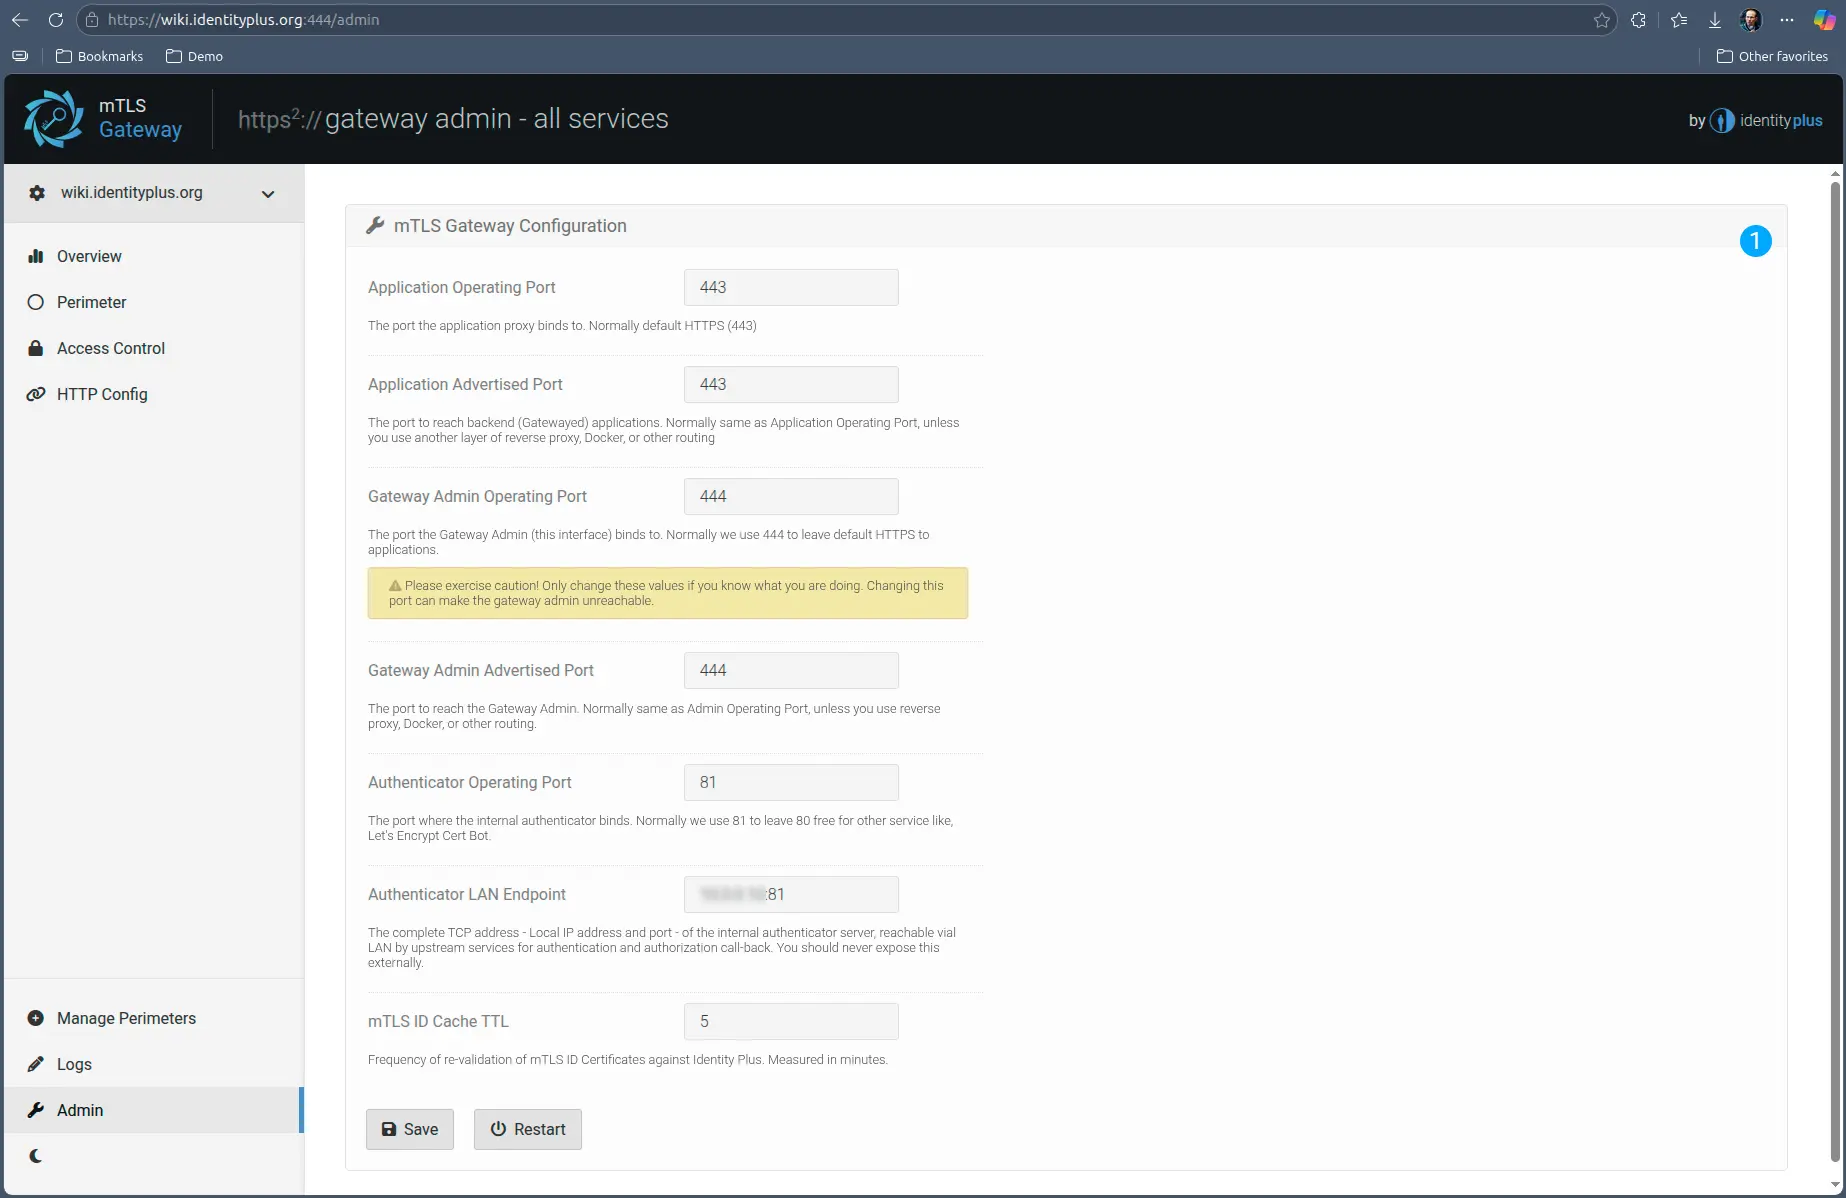
One notable parameter that may need more customization is the Authentication LAN endpoint, which is the internal OIDC endpoint internal (upstream) services must reach back to the Gateway for mTLS Identity / Local account mapping information.
The IP address (or local DNS) must be precisely how the traffic reaches to the host and from the host internally into the Docker container.
LEGAL
Copyright © 2026,
Identity Plus, Inc., New Hampshire, USA,
All rights reserved