Securing Internet Facing Databases with mTLS Perimeter,

800K PostgreSQL instances are exposed across the Internet protected by nothing but a password, the vast majority of them don’t even use TLS to ensure privacy of the communication. This pattern repeats for other database services, with more than 1.5m MySQL, nearly 100K MongoDB, and the list goes on for other - more niche databases - and various other types of servers.
This is not surprising. Most of these applications have their own, highly specific, layer 5, 6, 7 protocols, which are fundamentally distinct from the HTTP protocol on which the WWW was built. This also means that they have application specific ways of handling TLS - both on the server and the client side - which in turn differs from the mainstream HTTP specific Internet.
The vast majority of tools and solutions designed to make TLS simpler on the Internet will have severe limitations or not work at all for these applications, meaning teams looking to enforce privacy and security are in for a significant manual effort, fraught with complexity and outages.
Unfortunately, opting out can have severe consequences. None of these applications were designed to operate on the open Internet, without the protection of a private network. They don’t have rate limiting, brute force protection and auditability is limited. In addition, firewall options are limited by the ever more dynamic nature of the Internet, and there are no means to protect against application vulnerabilities which are highly specific both in terms of discovery and mitigation.
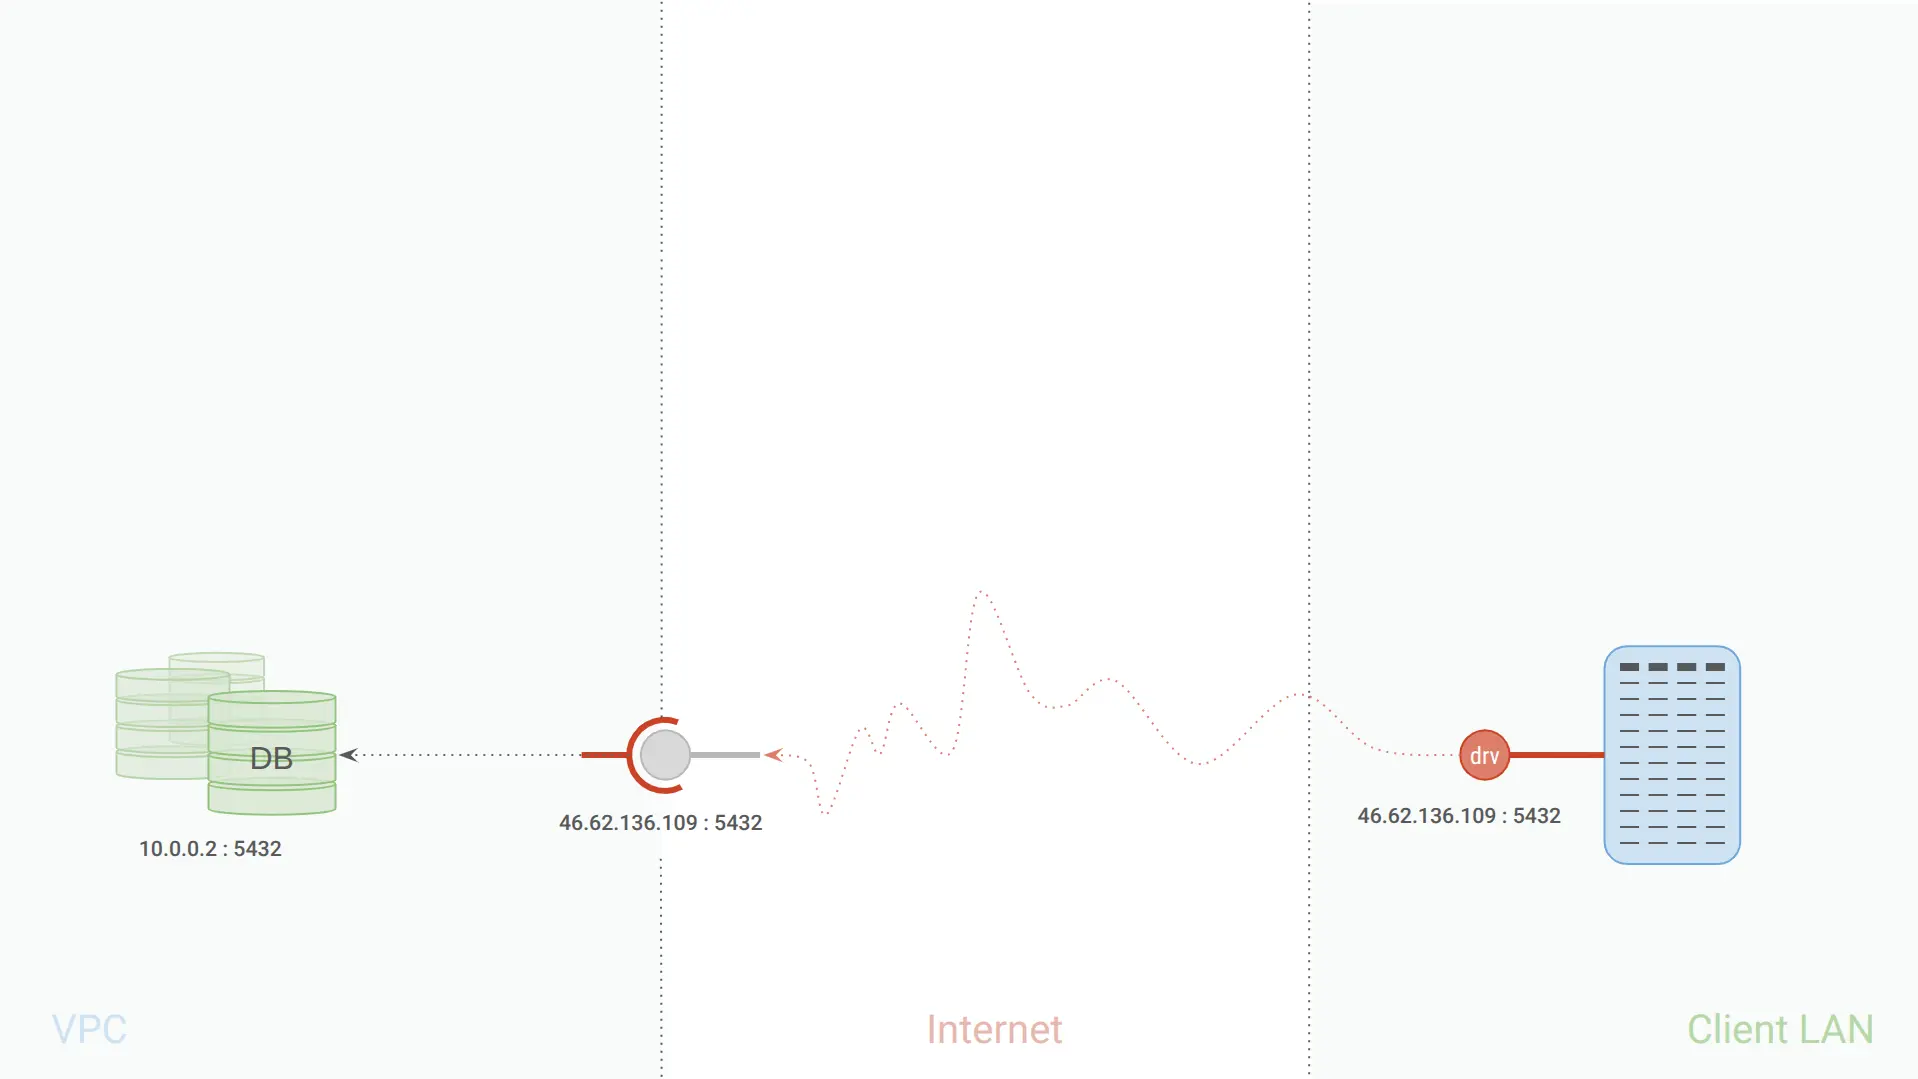
To put this into context, most of these vulnerable environments look something like this:
Somewhere in a cloud, in a VPC, there is a running instance of PostgreSQL DB, which is exposed to the Internet through some routing service - most often in clear text. I’m going to focus on Postgres today, but the solution works for any database or other TCP/IP application for that matter.
This service is then consumed by one or more client services that reside somewhere across the Internet in a local environment - personal or a different cloud.
In this practical use case, I am going to show how mTL Identity and mTLS Perimeter can help secure such an interconnected environment with very little effort and minimum to no intrusion. If you want to try this yourself, follow the instructions in this transcript.
Here is a little summary of the activities for this session:
I’ll start by provisioning the Postgres service - my routing is already defined - and if you want to do this exact exercise yourself, you can find the cloud init file in the demo section on Github in the mTLS Gateway project: the link is on the right.
It’s a simple shell script that installs docker and then runs a very generic Postgres instance on standard ports and clear text using some default admin credentials. I am using some shortcuts in this video to minimize distraction but in a real deployment please make sure you follow common security practices.
This will provision pretty fast, so in the meantime I’ll set up the admin connection locally, on my machine. For this reason, I‘m copying the public IP address where my Postgres instance is exposed to create a server connection.
Once done and connected, all I want to do for now is create a demo database. I will continue the rest from a client application written in Java to demonstrate access via the native driver.
The Identity Plus ecosystem is exclusively mutual TLS based. Every communication is possible only through mTLS based client certificate authentication, including the dashboard. So to access it, I must first enroll my device by installing a certificate which I will get from signon.identity.plus.
Start by receiving a one-time token by email - please check your SPAM folder and mark as non-spam if the email lands in your SPAM box - and follow the steps on the screen.
While installing you’ll be asked for a device name, which is a name whose purpose is solely to be suggestive to you so you can differentiate between your devices.
Identity Plus has an identity oriented architecture - which means you don’t have individual passwords for different accounts which then you copy for use on all of your devices, you have individual identities for each of your devices, which you will use with all mTLS Identity compatible services. This is completely backwards compared to your usual IAM architecture, but this is precisely why you'll end up working a lot less while improving security by many orders of magnitude. To name just one, with mTLS Identity you don't have the problem of secrets management - which not only reduces workload and tooling, but it also eliminates the biggest vector for mistakes around credentials and the ensuing consequences - impersonation - which is the underlying cause in 80% of the breaches.
At this stage please copy the password to your clipboard, it is the only element needed to install the certificate after you downloaded it. Open the downloaded file, and leave everything default. When asked for the password - paste it into the field - and continue with default.
After the certificate installs, there may be a lag until your browser picks it up - because they cache TLS connections - but you can circumvent this if you open a private window. Identity Plus is certificate based - you don’t need cookies - so there is no downside to this.
In the private window, go to https://my.identity.plus. When prompted for a certificate, please choose the one starting mTLS ID and hit OK. There are no usernames or passwords going forward, this one click is your login everywhere within the mTLS Identity ecosystem.
In the Identity Details section, please scroll down to the bottom and enable developer mode, which will show the link to the mTLS Perimeter Dashboard. You only need this if you work with services, but in our case we do.
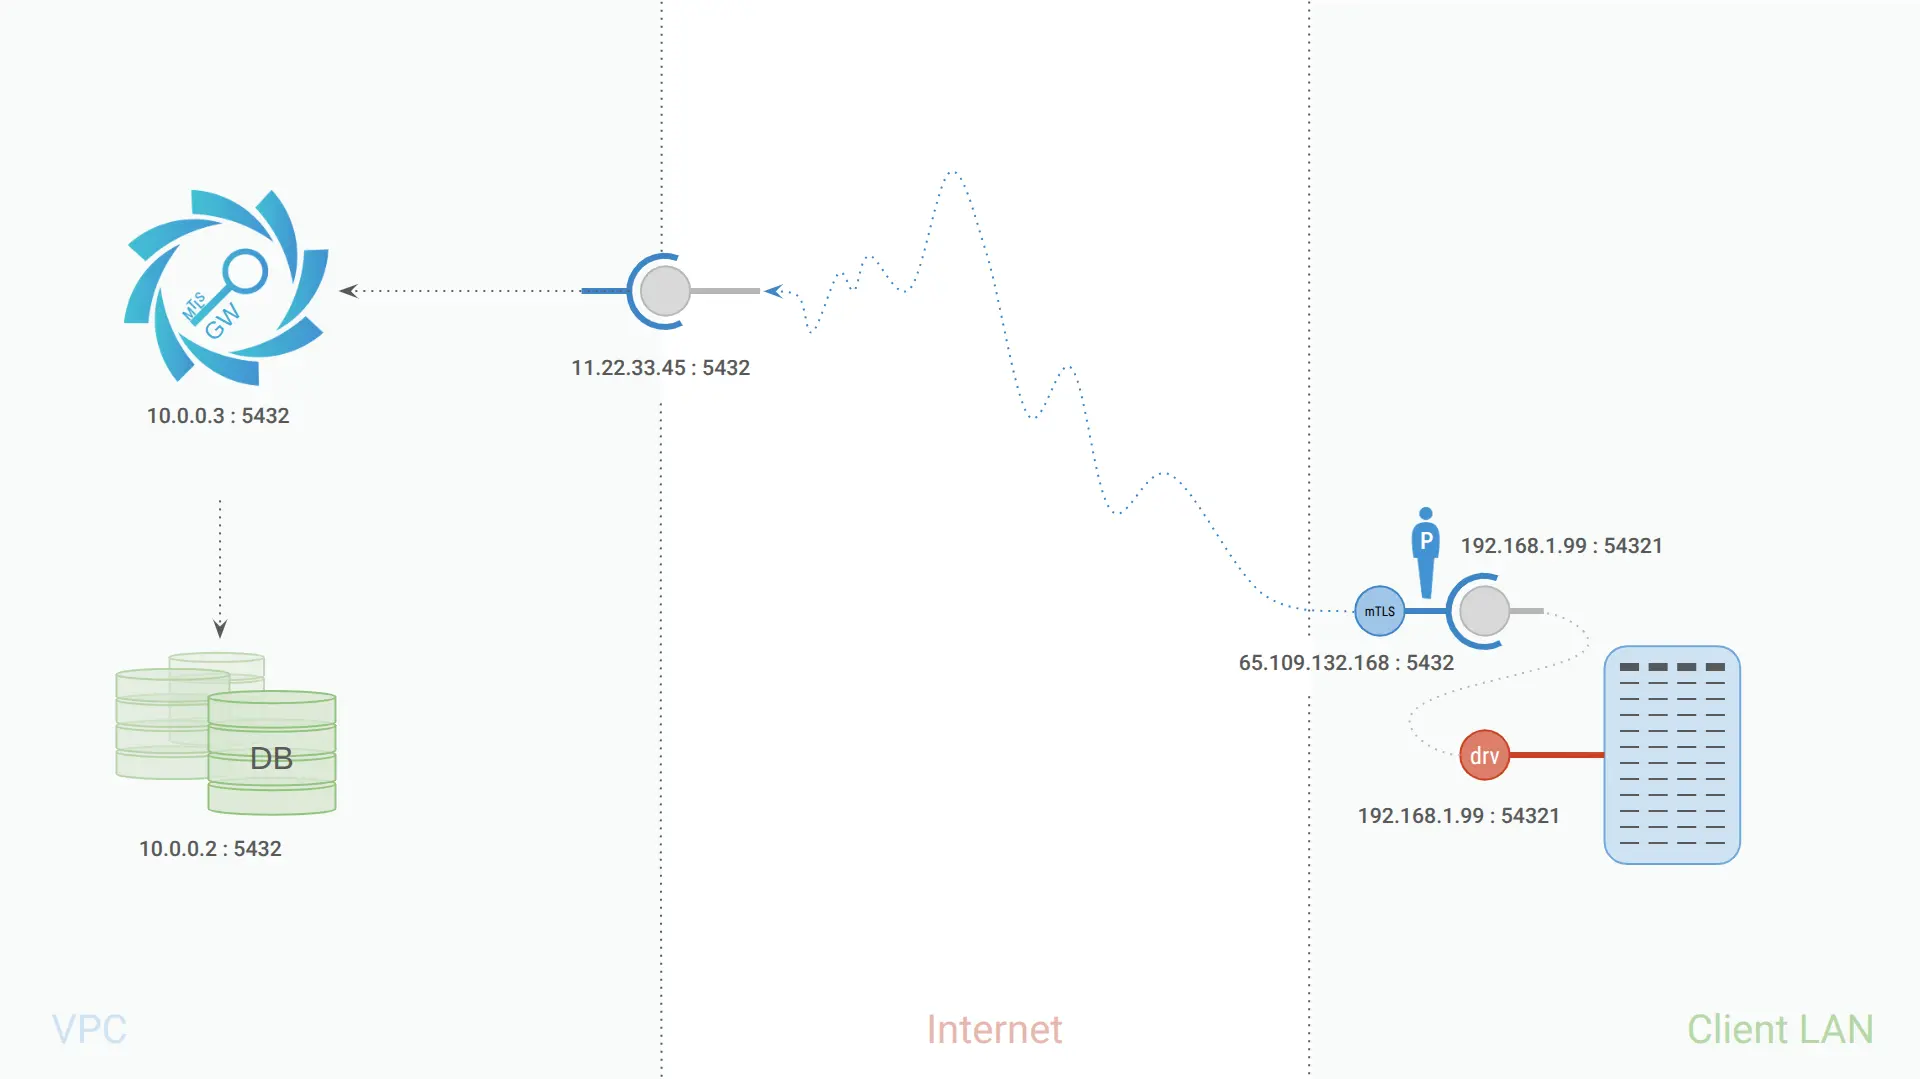
As the first step of the graceful roll-out, we are going to provision the Gateway in the same VPC where the PostgreSQL database resides. We are going to do this in two steps.
Like everything in the Identity Plus ecosystem, the Internet facing mTLS Perimeter protected PostgreSQL service, has an identity and it is mapped as a service. We are going to configure this service in the mTLS Perimeter Dashboard. This is a configuration only step.
Second, we are going to deploy the Gateway, and configure it to route traffic to the PostgreSQL instance we want to protect.
As before, the video will guide you visually through these steps, but there is a written break-down below for further reference.
To minimize the back-and-forth, I will start by provisioning the VM where the mTLS Gateway will be hosted. There is a cloud init shell available on Github in the mTLS Gateway project - link in the right - which provisions docker, clones the mTLS project, builds the docker image and fires up an mTLS Gateway instance.
The Gateway will be in an uninitialized state at this time - with no identity and ownership - so port 80 must be open from the firewall. I recommend making it open only to your outbound public IP address.
Open the mTLS Perimeter Dashboard - login is the same - and create your first Organizations - your list will be empty. Organization ID is important, because it will be used to allocate a namespace to the organization: orgid.mtls.app, where subsequent services will be allocated.
After the org is created, we’ll create a postgress service. The mTLS Gateway itself does not need a dedicated service - it’s a bridge for services. Once created, a domain name will be allocated which we can use for service discovery purposes in the DNS ecosystem. I’m going to copy the public IP address of the Gateway as allocated in the cloud and will create an empty DNS record (a root record), which then I will use to resolve the server’s location and connect to it.
However, to initialize the mTLS Gateway I will have to go to the IP address directly. The .app top lever domain is a secure domain, so the browser will not accept it without a certificate which we are yet to provision.
To do so, I’m going to grab an autoprovisioning token in the service agents section and use this to provision the first service route on the gateway.
To continue over TLS on the Gateway we need to tell the browser to trust Identity Plus issued server certificates. We are a client certificate focused service and our server certificates are not yet publicly trusted. In the service space this is not an issue as you should be explicitly trusting all issuers for security reasons anyway, but in this case I need to do it for the end-user space too. You can download the root in the Server Profile menu and follow the instructions to trust it. This step is unavoidable as the browser will not allow you to accept exceptions for a secure domain - everything needs to be done by the book.
Once provisioned and the root trusted, you can click the “continue over mTLS”. You will see the same identification process - using the device client certificate without username or password - which grants you access to the Gateway.
As a side-note, at this point the Gateway closes port 80 and it will never re-open it unless you manually set it back to its pristine unconfigured form by deleting the configuration directory and all its content. Long story short, you can close off port 80 from the firewall.
On the Overview menu you can see some general information about the gateway, updates, stats and your identity and role with the Gateway.
The Basic configuration is where we will set up the routing. Since postgres is not HTTP, we will switch proxying to TCP mode - the proxy becomes completely transparent from an application protocol perspective - and we change the port to the standard postgres port.
For clarity, this port will accept mutual TLS traffic only, it will not be able to respond to clear text connection requests. When saving, the Gateway will signal an error as it cannot find the w1. subdomain for the worker service. We can solve this either by defining the w1 DNS record in mTLS Perimeter Dashboard pointing to the local IP address of Postgres in the VPC, or we can delete it and simply add an IP based upstream route.
For this, I will grab the local IP address of the postgres instance in my VPC and add the route in mTLS Gateway. With this step completed, the mTLS Gatweay now accepts mTLS authenticated clients on port 5432, and will route them over to Postgre SQL server locally, in clear text.
We are almost done on the server side, we only have one configuration step, but for that we need the client information, so let’s set up the client components also.
Like services - which is a bit more intuitive in today’s world - in the mTLS Identity ecosystem, clients have identities too and they are mapped in the system also as services. While they may or may not have a server profile, they do need an identity so we can issue identification which they can then use to identify themselves - imagine this as people in a society.
This will basically repeat the steps I have completed for the PostgreSQL server. I will create a service, with a different name this time. I will do so in the same organization, but the process is exactly the same if I do it in a different organization.
The result is a service with its own domain allocated in the organization namespace, which is a third party to our original postgres service, whether it sits in the same organization or not. The relationship between them will be mapped via role based access control (RBAC) which we will take care of later on.
To perform actions - act as clients - services have agents, just like you have your browser as agent through which you navigate the web (you act as a client to services). These agents have IDs - which we call mTLS IDs - client certificates representing the service through their agents. For our PostgreSQL client to access the mTLS Gateway, we need to provision this agent and its ID on the point where the client resides.
We can do this 100% programming language agnostically using the selfauthority command line interface. The CLI is Golang based, so it is operating system agnostic. The following steps are run on Ubuntu Linux, but they have one to one equivalent in every OS.
I will start by making sure the Golang SDK is installed, and if not install it.
sudo apt install golang
Then I will create a directory to host my mTLS Identity specific tools, clone the Selfauthority CLI and build it. It is important to use root privileges, as the build shell script will attempt to create a symbolic link so that you can use the selfauthority command directly.
sudo mkdir /opt/identity.plus
cd /opt/identity.plus
sudo git clone https://github.com/IdentityPlus/mtls-self-authority.git
cd /opt/identity.plus/mtls-self-authority/
sudo ./build.sh
I will then create a directory in the /etc directory to hold the client ID information, and copy the ID config and the ID automation shell into the folder.
The config file is very basic, it tells the CLI to simply store ID information in the current directory and how to trust the root certificate issuing the server certificate.
sudo mkdir /etc/client.pgdemo.mtls.app
sudo cp /opt/identity.plus/mtls-self-authority/mtls-id.yaml /etc/client.pgdemo.mtls.app/
sudo cp /opt/identity.plus/mtls-self-authority/autorenew.sh /etc/client.pgdemo.mtls.app/
With this done I will go to the Service Agents section of the Client Service in the mTLS Perimeter Dashboard and will grab an auto-provisioning token - just as in case of the server - and I will use that in the CLI to provision the ID right there on the machine it will live on:
cd /etc/client.pgdemo.mtls.app
sudo selfauthority enroll [paste auto-provisioning token here]
Check to make sure it was successful. The token has a 5 minute lifetime only so please do this in one go. If it expires, you can always get a new one.
You can also execute an update command, which at this point should tell you that there is nothing to be done since the certificate has not yet passed 75% of its lifetime.
sudo selfauthority update
With this done, let's make sure we never encounter an outage due to certificate expiration.
With mTLS Identity, clients rotate their own certificates independent of the service, so we can fully automate the process. To do this, simply execute the autorenew shell script. All it does is to run the selfauthority update command - which will auto renew the ID if necessary and it will install a corn job (if not already installed) to run this shell every morning at 4am.
sudo ./autorenew.sh
sudo crontab -l
This identity can be used by any application programming language to establish mTLS authenticated client calls to mTLS Perimeter protected services. It is a standard client certificate in every technical way. All the client needs to make sure is to reload the certificate if it has been rotated automatically by the selfauthority shell. It is part of the TLS protocol so it has 100% compatibility for all networking based programming languages.
That said, in our case, we don’t want to touch the client, so instead, we are going to use mTLS Persona, which can wrap a plain old TCP call into an agentic, identity enabled client call. This is particularly useful when you do not have access to modify the client to make mTLS calls, such as is the case of the postgres driver, or the postgres admin panel in our example.
I am going to cd back to the mTLS Identity toolset directory and I am going to clone the mTLS Persona utility and then build it, just as I did in case of selfauthority. It is also a Golang based utility so it has good OS coverage.
cd /opt/identity.plus
sudo git clone https://github.com/IdentityPlus/mtls-persona.git
cd /opt/identity.plus/mtls-persona
sudo ./build.sh
To automatically start and restart mTLS Persona, in case of an unplanned reboot, you can transform it into a service using supervisor on any Linux system. I recommend testing your environment first, but this side-note belongs here structurally.
To do this, please install supervisor utility:
sudo apt install supervisor
Then create a supervisor configuration entry - please update the identity folder accordingly in the config.
echo "[supervisord]" > /etc/supervisord.conf && \
    echo "" >> /etc/supervisord.conf && \
    echo "[program:mtls-persona]" >> /etc/supervisord.conf && \
    echo "directory=/etc/identit-folder-here/" >> /etc/supervisord.conf && \
    echo "stdout_logfile=/var/log/mtls-persona.log" >> /etc/supervisord.conf && \
    echo "stdout_logfile_maxbytes=0" >> /etc/supervisord.conf && \
    echo "stderr_logfile=/var/log/mtls-persona.err" >> /etc/supervisord.conf && \
    echo "stderr_logfile_maxbytes=0" >> /etc/supervisord.conf && \
    echo "command=/opt/identity.plus/mtls-persona/mtls-persona" >> /etc/supervisord.conf
And then start, or restart supervisor service.
sudo service supervisor start
Before I start mTLS Persona, I am going to copy the configuration file into the identity directory:
sudo cp /opt/identity.plus/mtls-persona/mtls-persona.yaml /etc/client.pgdemo.mtls.app/
I will then edit the file to point Persona's outbound to the mTLS Gateway using the earlier defined DNS name, and to define the local inbound endpoint where it will receive clear text traffic.
To redirect the traffic via the mTLS channel, all you need to do now is to start mTLS Persona and then change the client’s destination end-point.
cd /etc/client.pgdemo.mtls.app
sudo mtls-persona
This should be a configuration change in all clients.
Once done, test your client. This will result in a failure - which takes us back to the last piece, the RBAC configuration I mentioned before.
It fails because the client has no role configured on the service so it will deny access. We want this. The gateway will do the same to all 10 billion unauthenticated devices on the Internet resulting in a 99.99999% reduction in the surface of attack of your postgres server: no more password cracking, no vulnerability scanning, you practically disappear from the Internet for all that have no relationship with your service.
But the cool thing is that at the same time, you remain open to business. All you need to do to give somebody access is to go to the “Manage Roles” section in your Postgres service in the the mTLS Perimeter Dashboard and define a role, let’s say “Customer”.
Then let’s navigate in a different tab to the client, to grab the service name into the clipboard, after which in the “Services” section of the Postgres service we enroll the client with the newly defined role.
Now we go back to the mTLS Gateway, and in the TCP config section, we simply tell the Gateway to let the “Customer” role through.
You can repeat this step for any number of services, internal or third party, and any role.
With this step done, I recommend performing a thorough testing for the environment.
If all went well, you can disable the insecure ingress endpoint for your PostgreSQL service and become out of scope for cybercriminals, scanners and other types of unwanted traffic.
With this step done, you have enabled zero-management, zero-outage and truly zero-trust access control for your Postgress server-and-client environment. While it’s good to monitor, you practically never have to manage this interaction - you don’t have passwords, API keys, you don’t need a secrets management tool, you don’t fiddle with certificate rotation - this happens on its own. All you need to do, is when you no longer need your client, you decommission/or revoke the ID from the dashboard.
You can scale this across any number of services, both internally for micro-services, or with third parties. One mTLS Gateway instance can be used to route traffic to multiple services, so you only need to do this once per VPC.
If you have third party services accessing your Postgres they only need to complete the client part of this setup so the two of you can literally switch from insecure to highly secure in minutes and no disruption.
They will of course benefit from the no-management nature of their mTLS Identity which effectively means that not only do you eliminate your exposure - which is a vector for breaches caused by vulnerabilities lurking in your application stack - but you also close off impersonation - which is a vector primarily driven by third parties mismanaging access keys to your system.
Old authentication ways - while they often become unnecessary - can continue to exist. Since mTLS sits below the application protocol, there is no disruption to the old ways - only augmentation.
An important licensing note. The entire service - both mTLS Identity and mTLS perimeter - is free of charge for personal use and public benefit not-for-profit organizations. Please choose the organization type accordingly. If you require an enterprise license, please don’t hesitate to contact us either via Linked in or our contact page.
Thank you for your time
LEGAL
Copyright © 2026,
Identity Plus, Inc., New Hampshire, USA,
All rights reserved